SpringSecurity6_3
Reference
https://docs.spring.io/spring-security/site/docs/
https://docs.spring.io/spring-security/reference/6.3/index.html
https://github.com/spring-projects/spring-security-samples/tree/6.3.x
Architecture
https://docs.spring.io/spring-security/reference/6.3/servlet/architecture.html
DelegatingFilterProxy
Spring provides a Filter implementation named DelegatingFilterProxy that allows bridging between the Servlet container’s lifecycle and Spring’s ApplicationContext. The Servlet container allows registering Filter instances by using its own standards, but it is not aware of Spring-defined Beans. You can register DelegatingFilterProxy through the standard Servlet container mechanisms but delegate all the work to a Spring Bean that implements Filter.
Here is a picture of how DelegatingFilterProxy fits into the Filter instances and the FilterChain.
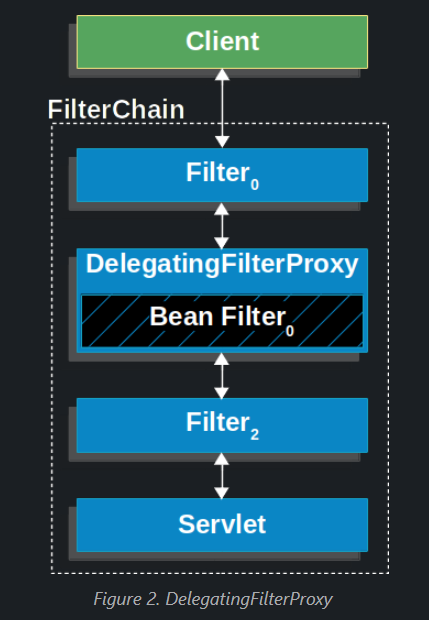
DelegatingFilterProxy looks up Bean Filter0 from the ApplicationContext and then invokes Bean Filter0.
Another benefit of DelegatingFilterProxy is that it allows delaying looking up Filter bean instances. This is important because the container needs to register the Filter instances before the container can start up. However, Spring typically uses a ContextLoaderListener to load the Spring Beans, which is not done until after the Filter instances need to be registered.
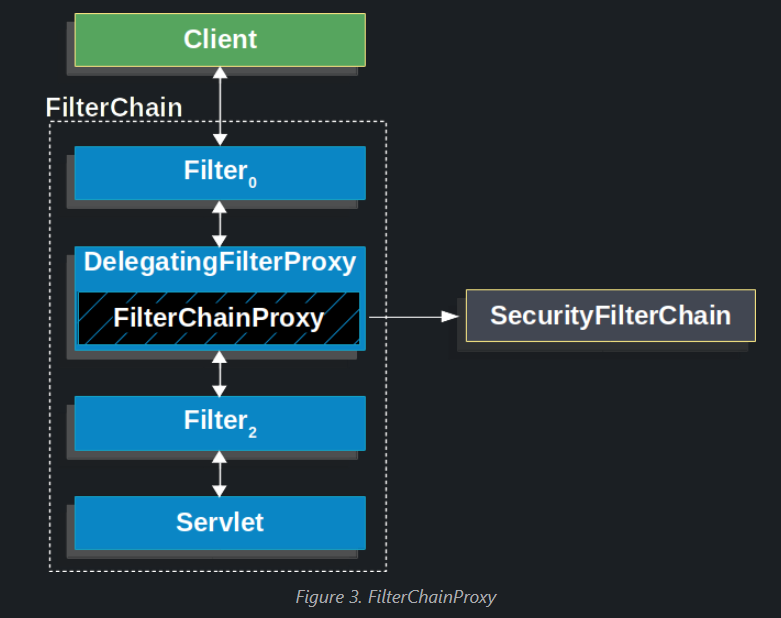
FilterChainProxy
Spring Security’s Servlet support is contained within FilterChainProxy. FilterChainProxy is a special Filter provided by Spring Security that allows delegating to many Filter instances through SecurityFilterChain. Since FilterChainProxy is a Bean, it is typically wrapped in a DelegatingFilterProxy.
The following image shows the role of FilterChainProxy.
SecurityFilterChain
SecurityFilterChain is used by FilterChainProxy to determine which Spring Security Filter instances should be invoked for the current request.
The following image shows the role of SecurityFilterChain.
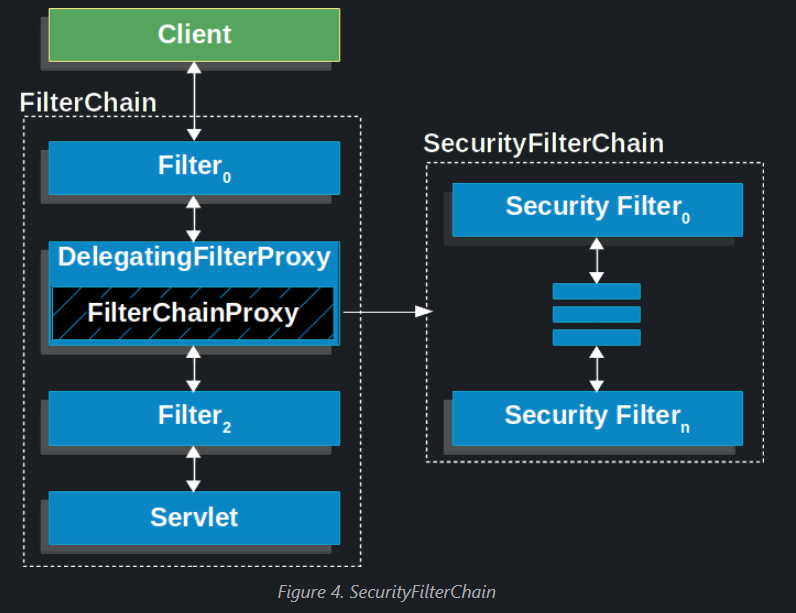
The Security Filters in SecurityFilterChain are typically Beans, but they are registered with FilterChainProxy instead of DelegatingFilterProxy. FilterChainProxy provides a number of advantages to registering directly with the Servlet container or DelegatingFilterProxy. First, it provides a starting point for all of Spring Security’s Servlet support. For that reason, if you try to troubleshoot Spring Security’s Servlet support, adding a debug point in FilterChainProxy is a great place to start.
Second, since FilterChainProxy is central to Spring Security usage, it can perform tasks that are not viewed as optional. For example, it clears out the SecurityContext to avoid memory leaks. It also applies Spring Security’s HttpFirewall to protect applications against certain types of attacks.
In addition, it provides more flexibility in determining when a SecurityFilterChain should be invoked. In a Servlet container, Filter instances are invoked based upon the URL alone. However, FilterChainProxy can determine invocation based upon anything in the HttpServletRequest by using the RequestMatcher interface.
The following image shows multiple SecurityFilterChain instances:

In the Multiple SecurityFilterChain figure, FilterChainProxy decides which SecurityFilterChain should be used. Only the first SecurityFilterChain that matches is invoked. If a URL of /api/messages/ is requested, it first matches on the SecurityFilterChain0 pattern of /api/**, so only SecurityFilterChain0 is invoked, even though it also matches on SecurityFilterChainn. If a URL of /messages/ is requested, it does not match on the SecurityFilterChain0 pattern of /api/**, so FilterChainProxy continues trying each SecurityFilterChain. Assuming that no other SecurityFilterChain instances match, SecurityFilterChainn is invoked.
Security Filters
The Security Filters are inserted into the FilterChainProxy with the SecurityFilterChain API. Those filters can be used for a number of different purposes, like authentication, authorization, exploit protection, and more. The filters are executed in a specific order to guarantee that they are invoked at the right time, for example, the Filter that performs authentication should be invoked before the Filter that performs authorization. It is typically not necessary to know the ordering of Spring Security’s Filters. However, there are times that it is beneficial to know the ordering, if you want to know them, you can check the FilterOrderRegistration code.
To exemplify the above paragraph, let’s consider the following security configuration:
@Configuration
@EnableWebSecurity
public class SecurityConfig {

    @Bean
    public SecurityFilterChain filterChain(HttpSecurity http) throws Exception {
        http
            .csrf(Customizer.withDefaults())
            .authorizeHttpRequests(authorize -> authorize
                .anyRequest().authenticated()
            )
            .httpBasic(Customizer.withDefaults())
            .formLogin(Customizer.withDefaults());
        return http.build();
    }

}
The above configuration will result in the following Filter ordering:
| Filter | Added by |
|---|---|
| CsrfFilter | HttpSecurity#csrf |
| UsernamePasswordAuthenticationFilter | HttpSecurity#formLogin |
| BasicAuthenticationFilter | HttpSecurity#httpBasic |
| AuthorizationFilter | HttpSecurity#authorizeHttpRequests |
- First, the
CsrfFilteris invoked to protect against CSRF attacks. - Second, the authentication filters are invoked to authenticate the request.
- Third, the
AuthorizationFilteris invoked to authorize the request.
Printing the Security Filters
Often times, it is useful to see the list of security Filters that are invoked for a particular request. For example, you want to make sure that the filter you have added is in the list of the security filters.
The list of filters is printed at INFO level on the application startup, so you can see something like the following on the console output for example:
2023-06-14T08:55:22.321-03:00  INFO 76975 --- [           main] o.s.s.web.DefaultSecurityFilterChain     : Will secure any request with [
org.springframework.security.web.session.DisableEncodeUrlFilter@404db674,
org.springframework.security.web.context.request.async.WebAsyncManagerIntegrationFilter@50f097b5,
org.springframework.security.web.context.SecurityContextHolderFilter@6fc6deb7,
org.springframework.security.web.header.HeaderWriterFilter@6f76c2cc,
org.springframework.security.web.csrf.CsrfFilter@c29fe36,
org.springframework.security.web.authentication.logout.LogoutFilter@ef60710,
org.springframework.security.web.authentication.UsernamePasswordAuthenticationFilter@7c2dfa2,
org.springframework.security.web.authentication.ui.DefaultLoginPageGeneratingFilter@4397a639,
org.springframework.security.web.authentication.ui.DefaultLogoutPageGeneratingFilter@7add838c,
org.springframework.security.web.authentication.www.BasicAuthenticationFilter@5cc9d3d0,
org.springframework.security.web.savedrequest.RequestCacheAwareFilter@7da39774,
org.springframework.security.web.servletapi.SecurityContextHolderAwareRequestFilter@32b0876c,
org.springframework.security.web.authentication.AnonymousAuthenticationFilter@3662bdff,
org.springframework.security.web.access.ExceptionTranslationFilter@77681ce4,
org.springframework.security.web.access.intercept.AuthorizationFilter@169268a7]
And that will give a pretty good idea of the security filters that are configured for each filter chain.
But that is not all, you can also configure your application to print the invocation of each individual filter for each request. That is helpful to see if the filter you have added is invoked for a particular request or to check where an exception is coming from. To do that, you can configure your application to log the security events.
Adding a Custom Filter to the Filter Chain
Most of the time, the default security filters are enough to provide security to your application. However, there might be times that you want to add a custom Filter to the security filter chain.
For example, let’s say that you want to add a Filter that gets a tenant id header and check if the current user has access to that tenant. The previous description already gives us a clue on where to add the filter, since we need to know the current user, we need to add it after the authentication filters.
First, let’s create the Filter:
import java.io.IOException;

import jakarta.servlet.Filter;
import jakarta.servlet.FilterChain;
import jakarta.servlet.ServletException;
import jakarta.servlet.ServletRequest;
import jakarta.servlet.ServletResponse;
import jakarta.servlet.http.HttpServletRequest;
import jakarta.servlet.http.HttpServletResponse;

import org.springframework.security.access.AccessDeniedException;

public class TenantFilter implements Filter {

    @Override
    public void doFilter(ServletRequest servletRequest, ServletResponse servletResponse, FilterChain filterChain) throws IOException, ServletException {
        HttpServletRequest request = (HttpServletRequest) servletRequest;
        HttpServletResponse response = (HttpServletResponse) servletResponse;

        String tenantId = request.getHeader("X-Tenant-Id"); (1)
        boolean hasAccess = isUserAllowed(tenantId); (2)
        if (hasAccess) {
            filterChain.doFilter(request, response); (3)
            return;
        }
        throw new AccessDeniedException("Access denied"); (4)
    }

}
The sample code above does the following:
| Get the tenant id from the request header. | |
|---|---|
| Check if the current user has access to the tenant id. | |
| If the user has access, then invoke the rest of the filters in the chain. | |
If the user does not have access, then throw an AccessDeniedException. |
Tip:Instead of implementing Filter, you can extend from OncePerRequestFilter which is a base class for filters that are only invoked once per request and provides a doFilterInternal method with the HttpServletRequest and HttpServletResponse parameters.
Now, we need to add the filter to the security filter chain.
@Bean
SecurityFilterChain filterChain(HttpSecurity http) throws Exception {
    http
        // ...
        .addFilterBefore(new TenantFilter(), AuthorizationFilter.class);
    return http.build();
}
Use HttpSecurity#addFilterBefore to add the TenantFilter before the AuthorizationFilter.
By adding the filter before the AuthorizationFilter we are making sure that the TenantFilter is invoked after the authentication filters. You can also use HttpSecurity#addFilterAfter to add the filter after a particular filter or HttpSecurity#addFilterAt to add the filter at a particular filter position in the filter chain.
And that’s it, now the TenantFilter will be invoked in the filter chain and will check if the current user has access to the tenant id.
Be careful when you declare your filter as a Spring bean, either by annotating it with @Component or by declaring it as a bean in your configuration, because Spring Boot will automatically register it with the embedded container. That may cause the filter to be invoked twice, once by the container and once by Spring Security and in a different order.
If you still want to declare your filter as a Spring bean to take advantage of dependency injection for example, and avoid the duplicate invocation, you can tell Spring Boot to not register it with the container by declaring a FilterRegistrationBean bean and setting its enabled property to false:
@Bean
public FilterRegistrationBean<TenantFilter> tenantFilterRegistration(TenantFilter filter) {
    FilterRegistrationBean<TenantFilter> registration = new FilterRegistrationBean<>(filter);
    registration.setEnabled(false);
    return registration;
}
Handling Security Exceptions
The ExceptionTranslationFilter allows translation of AccessDeniedException and AuthenticationException into HTTP responses.
ExceptionTranslationFilter is inserted into the FilterChainProxy as one of the Security Filters.
The following image shows the relationship of ExceptionTranslationFilter to other components:
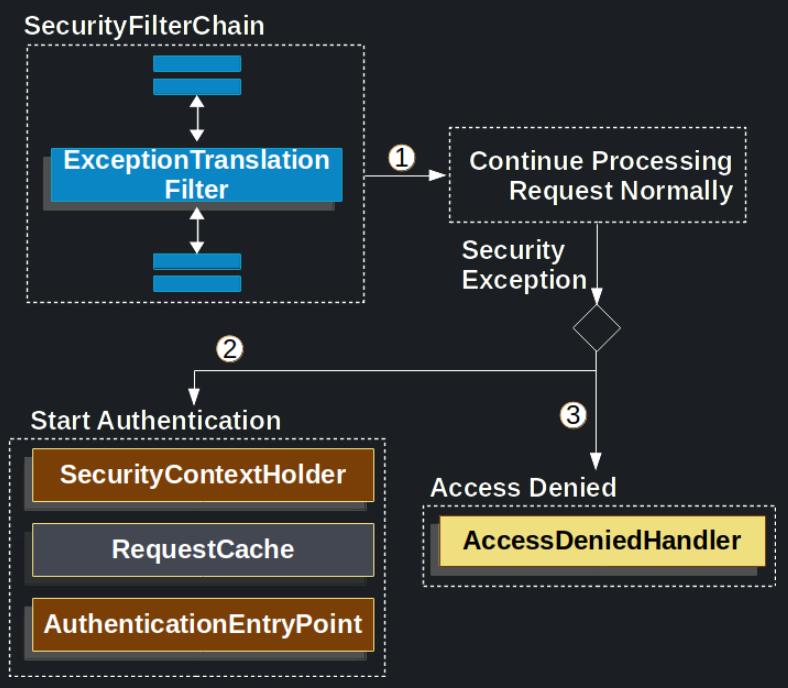
First, the ExceptionTranslationFilter invokes FilterChain.doFilter(request, response) to invoke the rest of the application.
If the user is not authenticated or it is an AuthenticationException, then Start Authentication.
- The SecurityContextHolder is cleared out.
- The
HttpServletRequestis saved so that it can be used to replay the original request once authentication is successful. - The
AuthenticationEntryPointis used to request credentials from the client. For example, it might redirect to a log in page or send aWWW-Authenticateheader.
Otherwise, if it is an AccessDeniedException, then Access Denied. The AccessDeniedHandler is invoked to handle access denied.
The pseudocode for ExceptionTranslationFilter looks something like this:
ExceptionTranslationFilter pseudocode
try {
    filterChain.doFilter(request, response); // 1
} catch (AccessDeniedException | AuthenticationException ex) {
    if (!authenticated || ex instanceof AuthenticationException) {
        startAuthentication(); // 2
    } else {
        accessDenied(); //3
    }
}
- As described in A Review of Filters, invoking
FilterChain.doFilter(request, response)is the equivalent of invoking the rest of the application. This means that if another part of the application, (FilterSecurityInterceptoror method security) throws anAuthenticationExceptionorAccessDeniedExceptionit is caught and handled here. - If the user is not authenticated or it is an
AuthenticationException, Start Authentication. - Otherwise, Access Denied
Saving Requests Between Authentication
As illustrated in Handling Security Exceptions, when a request has no authentication and is for a resource that requires authentication, there is a need to save the request for the authenticated resource to re-request after authentication is successful. In Spring Security this is done by saving the HttpServletRequest using a RequestCache implementation.
RequestCache
The HttpServletRequest is saved in the RequestCache. When the user successfully authenticates, the RequestCache is used to replay the original request. The RequestCacheAwareFilter uses the RequestCache to get the saved HttpServletRequest after the user authenticates, while the ExceptionTranslationFilter uses the RequestCache to save the HttpServletRequest after it detects AuthenticationException, before redirecting the user to the login endpoint.
By default, an HttpSessionRequestCache is used. The code below demonstrates how to customize the RequestCache implementation that is used to check the HttpSession for a saved request if the parameter named continue is present.
@Bean
DefaultSecurityFilterChain springSecurity(HttpSecurity http) throws Exception {
    HttpSessionRequestCache requestCache = new HttpSessionRequestCache();
    requestCache.setMatchingRequestParameterName("continue");
    http
        // ...
        .requestCache((cache) -> cache
            .requestCache(requestCache)
        );
    return http.build();
}
Prevent the Request From Being Saved
There are a number of reasons you may want to not store the user’s unauthenticated request in the session. You may want to offload that storage onto the user’s browser or store it in a database. Or you may want to shut off this feature since you always want to redirect the user to the home page instead of the page they tried to visit before login.
To do that, you can use the NullRequestCache implementation.
@Bean
SecurityFilterChain springSecurity(HttpSecurity http) throws Exception {
    RequestCache nullRequestCache = new NullRequestCache();
    http
        // ...
        .requestCache((cache) -> cache
            .requestCache(nullRequestCache)
        );
    return http.build();
}
RequestCacheAwareFilter
The RequestCacheAwareFilter uses the RequestCache to replay the original request.
Logging
To configure your application to log all the security events, you can add the following to your application:
<configuration>
    <appender name="STDOUT" class="ch.qos.logback.core.ConsoleAppender">
        <!-- ... -->
    </appender>
    <!-- ... -->
    <logger name="org.springframework.security" level="trace" additivity="false">
        <appender-ref ref="Console" />
    </logger>
</configuration>
Authentication
https://docs.spring.io/spring-security/reference/6.3/servlet/authentication/index.html
Servlet Authentication Architecture
https://docs.spring.io/spring-security/reference/6.3/servlet/authentication/architecture.html
This discussion expands on Servlet Security: The Big Picture to describe the main architectural components of Spring Security’s used in Servlet authentication. If you need concrete flows that explain how these pieces fit together, look at the Authentication Mechanism specific sections.
- SecurityContextHolder - The
SecurityContextHolderis where Spring Security stores the details of who is authenticated. - SecurityContext - is obtained from the
SecurityContextHolderand contains theAuthenticationof the currently authenticated user. - Authentication - Can be the input to
AuthenticationManagerto provide the credentials a user has provided to authenticate or the current user from theSecurityContext. - GrantedAuthority - An authority that is granted to the principal on the
Authentication(i.e. roles, scopes, etc.) - AuthenticationManager - the API that defines how Spring Security’s Filters perform authentication.
- ProviderManager - the most common implementation of
AuthenticationManager. - AuthenticationProvider - used by
ProviderManagerto perform a specific type of authentication. - Request Credentials with
AuthenticationEntryPoint- used for requesting credentials from a client (i.e. redirecting to a log in page, sending aWWW-Authenticateresponse, etc.) - AbstractAuthenticationProcessingFilter - a base
Filterused for authentication. This also gives a good idea of the high level flow of authentication and how pieces work together.
SecurityContextHolder
At the heart of Spring Security’s authentication model is the SecurityContextHolder. It contains the SecurityContext.
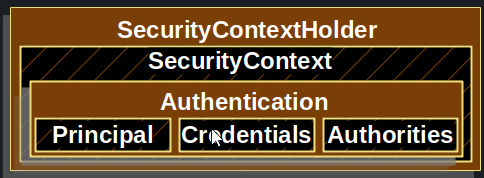
The SecurityContextHolder is where Spring Security stores the details of who is authenticated. Spring Security does not care how the SecurityContextHolder is populated. If it contains a value, it is used as the currently authenticated user.
The simplest way to indicate a user is authenticated is to set the SecurityContextHolder directly:
SecurityContext context = SecurityContextHolder.createEmptyContext();   // 1
Authentication authentication =
    new TestingAuthenticationToken("username", "password", "ROLE_USER");   //2
context.setAuthentication(authentication);

SecurityContextHolder.setContext(context);   //3
| 1 | We start by creating an empty SecurityContext. You should create a new SecurityContextinstance instead of using SecurityContextHolder.getContext().setAuthentication(authentication)to avoid race conditions across multiple threads. |
|---|---|
| 2 | Next, we create a newAuthenticationobject. Spring Security does not care what type of Authenticationimplementation is set on the SecurityContext. Here, we use TestingAuthenticationToken, because it is very simple. A more common production scenario is UsernamePasswordAuthenticationToken(userDetails, password, authorities). |
| 3 | Finally, we set the SecurityContexton the SecurityContextHolder. Spring Security uses this information forauthorization. |
To obtain information about the authenticated principal, access the SecurityContextHolder.
SecurityContext context = SecurityContextHolder.getContext();
Authentication authentication = context.getAuthentication();
String username = authentication.getName();
Object principal = authentication.getPrincipal();
Collection<? extends GrantedAuthority> authorities = authentication.getAuthorities();
By default, SecurityContextHolder uses a ThreadLocal to store these details, which means that the SecurityContext is always available to methods in the same thread, even if the SecurityContext is not explicitly passed around as an argument to those methods. Using a ThreadLocal in this way is quite safe if you take care to clear the thread after the present principal’s request is processed. Spring Security’s FilterChainProxy ensures that the SecurityContext is always cleared.
SecurityContext
The SecurityContext is obtained from the SecurityContextHolder. The SecurityContext contains an Authentication object.
Authentication
The Authentication interface serves two main purposes within Spring Security:
- An input to
AuthenticationManagerto provide the credentials a user has provided to authenticate. When used in this scenario,isAuthenticated()returnsfalse. - Represent the currently authenticated user. You can obtain the current
Authenticationfrom the SecurityContext.
The Authentication contains:
principal: Identifies the user. When authenticating with a username/password this is often an instance ofUserDetails.credentials: Often a password. In many cases, this is cleared after the user is authenticated, to ensure that it is not leaked.authorities: TheGrantedAuthorityinstances are high-level permissions the user is granted. Two examples are roles and scopes.
GrantedAuthority
GrantedAuthority instances are high-level permissions that the user is granted. Two examples are roles and scopes.
You can obtain GrantedAuthority instances from the Authentication.getAuthorities() method. This method provides a Collection of GrantedAuthority objects. A GrantedAuthority is, not surprisingly, an authority that is granted to the principal. Such authorities are usually “roles”, such as ROLE_ADMINISTRATOR or ROLE_HR_SUPERVISOR. These roles are later configured for web authorization, method authorization, and domain object authorization. Other parts of Spring Security interpret these authorities and expect them to be present. When using username/password based authentication GrantedAuthority instances are usually loaded by the UserDetailsService.
Usually, the GrantedAuthority objects are application-wide permissions. They are not specific to a given domain object. Thus, you would not likely have a GrantedAuthority to represent a permission to Employee object number 54, because if there are thousands of such authorities you would quickly run out of memory (or, at the very least, cause the application to take a long time to authenticate a user). Of course, Spring Security is expressly designed to handle this common requirement, but you should instead use the project’s domain object security capabilities for this purpose.
AuthenticationManager
AuthenticationManager is the API that defines how Spring Security’s Filters perform authentication. The Authentication that is returned is then set on the SecurityContextHolder by the controller (that is, by Spring Security’s Filters instances) that invoked the AuthenticationManager. If you are not integrating with Spring Security’s Filters instances, you can set the SecurityContextHolder directly and are not required to use an AuthenticationManager.
While the implementation of AuthenticationManager could be anything, the most common implementation is ProviderManager.
ProviderManager
ProviderManager is the most commonly used implementation of AuthenticationManager. ProviderManager delegates to a List of AuthenticationProvider instances. Each AuthenticationProvider has an opportunity to indicate that authentication should be successful, fail, or indicate it cannot make a decision and allow a downstream AuthenticationProvider to decide. If none of the configured AuthenticationProvider instances can authenticate, authentication fails with a ProviderNotFoundException, which is a special AuthenticationException that indicates that the ProviderManager was not configured to support the type of Authentication that was passed into it.
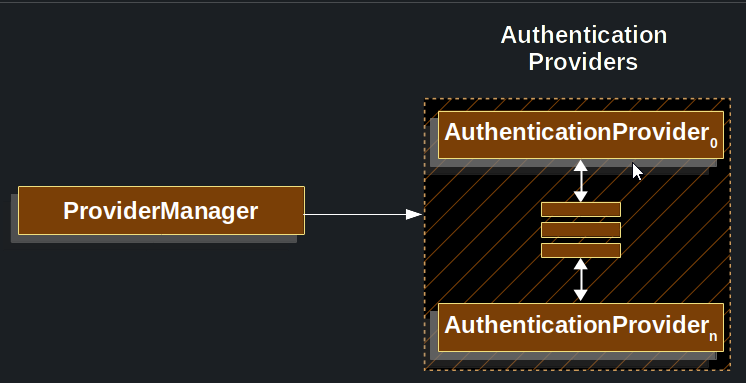
In practice each AuthenticationProvider knows how to perform a specific type of authentication. For example, one AuthenticationProvider might be able to validate a username/password, while another might be able to authenticate a SAML assertion. This lets each AuthenticationProvider do a very specific type of authentication while supporting multiple types of authentication and expose only a single AuthenticationManager bean.
ProviderManager also allows configuring an optional parent AuthenticationManager, which is consulted in the event that no AuthenticationProvider can perform authentication. The parent can be any type of AuthenticationManager, but it is often an instance of ProviderManager.
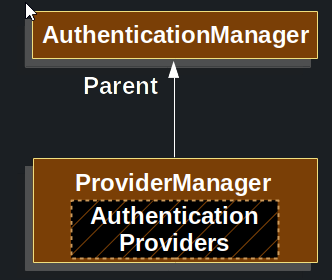
In fact, multiple ProviderManager instances might share the same parent AuthenticationManager. This is somewhat common in scenarios where there are multiple SecurityFilterChain instances that have some authentication in common (the shared parent AuthenticationManager), but also different authentication mechanisms (the different ProviderManager instances).

By default, ProviderManager tries to clear any sensitive credentials information from the Authentication object that is returned by a successful authentication request. This prevents information, such as passwords, being retained longer than necessary in the HttpSession.
This may cause issues when you use a cache of user objects, for example, to improve performance in a stateless application. If the Authentication contains a reference to an object in the cache (such as a UserDetails instance) and this has its credentials removed, it is no longer possible to authenticate against the cached value. You need to take this into account if you use a cache. An obvious solution is to first make a copy of the object, either in the cache implementation or in the AuthenticationProvider that creates the returned Authentication object. Alternatively, you can disable the eraseCredentialsAfterAuthentication property on ProviderManager. See the Javadoc for the ProviderManager class.
AuthenticationProvider
You can inject multiple AuthenticationProviders instances into ProviderManager. Each AuthenticationProvider performs a specific type of authentication. For example, DaoAuthenticationProvider supports username/password-based authentication, while JwtAuthenticationProvider supports authenticating a JWT token.
Request Credentials with AuthenticationEntryPoint
AuthenticationEntryPoint is used to send an HTTP response that requests credentials from a client.
Sometimes, a client proactively includes credentials (such as a username and password) to request a resource. In these cases, Spring Security does not need to provide an HTTP response that requests credentials from the client, since they are already included.
In other cases, a client makes an unauthenticated request to a resource that they are not authorized to access. In this case, an implementation of AuthenticationEntryPoint is used to request credentials from the client. The AuthenticationEntryPoint implementation might perform a redirect to a log in page, respond with an WWW-Authenticate header, or take other action.
AbstractAuthenticationProcessingFilter
AbstractAuthenticationProcessingFilter is used as a base Filter for authenticating a user’s credentials. Before the credentials can be authenticated, Spring Security typically requests the credentials by using AuthenticationEntryPoint.
Next, the AbstractAuthenticationProcessingFilter can authenticate any authentication requests that are submitted to it.
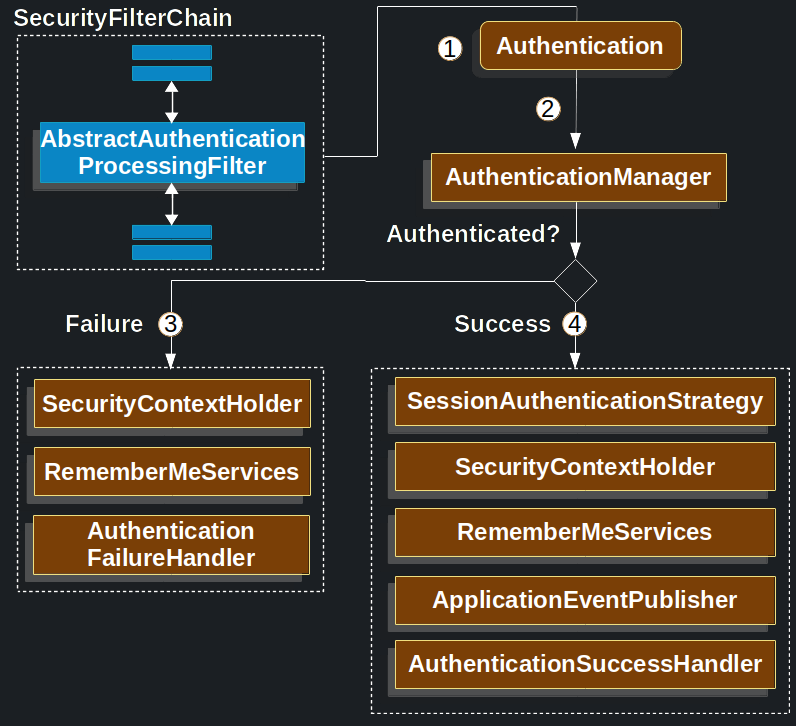
- When the user submits their credentials, the
AbstractAuthenticationProcessingFiltercreates anAuthenticationfrom theHttpServletRequestto be authenticated. The type ofAuthenticationcreated depends on the subclass ofAbstractAuthenticationProcessingFilter. For example,UsernamePasswordAuthenticationFiltercreates aUsernamePasswordAuthenticationTokenfrom a username and password that are submitted in theHttpServletRequest. - Next, the
Authenticationis passed into theAuthenticationManagerto be authenticated. - If authentication fails, then Failure.
- The SecurityContextHolder is cleared out.
RememberMeServices.loginFailis invoked. If remember me is not configured, this is a no-op. See theremembermepackage.AuthenticationFailureHandleris invoked. See theAuthenticationFailureHandlerinterface.
- If authentication is successful, then Success.
SessionAuthenticationStrategyis notified of a new login. See theSessionAuthenticationStrategyinterface.- The Authentication is set on the SecurityContextHolder. Later, if you need to save the
SecurityContextso that it can be automatically set on future requests,SecurityContextRepository#saveContextmust be explicitly invoked. See theSecurityContextHolderFilterclass. RememberMeServices.loginSuccessis invoked. If remember me is not configured, this is a no-op. See theremembermepackage.ApplicationEventPublisherpublishes anInteractiveAuthenticationSuccessEvent.AuthenticationSuccessHandleris invoked. See theAuthenticationSuccessHandlerinterface.
Username/Password Authentication
One of the most common ways to authenticate a user is by validating a username and password. Spring Security provides comprehensive support for authenticating with a username and password.
You can configure username and password authentication using the following:
@Configuration
@EnableWebSecurity
public class SecurityConfig {

    @Bean
    public SecurityFilterChain securityFilterChain(HttpSecurity http) throws Exception {
        http
            .authorizeHttpRequests((authorize) -> authorize
                .anyRequest().authenticated()
            )
            .httpBasic(Customizer.withDefaults())
            .formLogin(Customizer.withDefaults());

        return http.build();
    }

    @Bean
    public UserDetailsService userDetailsService() {
        UserDetails userDetails = User.withDefaultPasswordEncoder()
            .username("user")
            .password("password")
            .roles("USER")
            .build();

        return new InMemoryUserDetailsManager(userDetails);
    }

}
The preceding configuration automatically registers an in-memory UserDetailsService with the SecurityFilterChain, registers the DaoAuthenticationProvider with the default AuthenticationManager, and enables Form Login and HTTP Basic authentication.
To learn more about username/password authentication, consider the following use cases:
- I want to learn how Form Login works
- I want to learn how HTTP Basic authentication works
- I want to learn how
DaoAuthenticationProviderworks - I want to manage users in memory
- I want to manage users in a database
- I want to manage users in LDAP
- I want to publish an
AuthenticationManagerbean for custom authentication - I want to customize the global
AuthenticationManager
Publish an AuthenticationManager bean
A fairly common requirement is publishing an AuthenticationManager bean to allow for custom authentication, such as in a @Service or Spring MVC @Controller. For example, you may want to authenticate users via a REST API instead of using Form Login.
You can publish such an AuthenticationManager for custom authentication scenarios using the following configuration:
@Configuration
@EnableWebSecurity
public class SecurityConfig {

    @Bean
    public SecurityFilterChain securityFilterChain(HttpSecurity http) throws Exception {
        http
            .authorizeHttpRequests((authorize) -> authorize
                .requestMatchers("/login").permitAll()
                .anyRequest().authenticated()
            );

        return http.build();
    }

    @Bean
    public AuthenticationManager authenticationManager(
            UserDetailsService userDetailsService,
            PasswordEncoder passwordEncoder) {
        DaoAuthenticationProvider authenticationProvider = new DaoAuthenticationProvider();
        authenticationProvider.setUserDetailsService(userDetailsService);
        authenticationProvider.setPasswordEncoder(passwordEncoder);

        return new ProviderManager(authenticationProvider);
    }

    @Bean
    public UserDetailsService userDetailsService() {
        UserDetails userDetails = User.withDefaultPasswordEncoder()
            .username("user")
            .password("password")
            .roles("USER")
            .build();

        return new InMemoryUserDetailsManager(userDetails);
    }

    @Bean
    public PasswordEncoder passwordEncoder() {
        return PasswordEncoderFactories.createDelegatingPasswordEncoder();
    }

}
With the preceding configuration in place, you can create a @RestController that uses the AuthenticationManager as follows:
@RestController
public class LoginController {

    private final AuthenticationManager authenticationManager;

    public LoginController(AuthenticationManager authenticationManager) {
        this.authenticationManager = authenticationManager;
    }

    @PostMapping("/login")
    public ResponseEntity<Void> login(@RequestBody LoginRequest loginRequest) {
        Authentication authenticationRequest =
            UsernamePasswordAuthenticationToken.unauthenticated(loginRequest.username(), loginRequest.password());
        Authentication authenticationResponse =
            this.authenticationManager.authenticate(authenticationRequest);
        // ...
    }

    public record LoginRequest(String username, String password) {
    }

}
Customize the AuthenticationManager
Normally, Spring Security builds an AuthenticationManager internally composed of a DaoAuthenticationProvider for username/password authentication. In certain cases, it may still be desired to customize the instance of AuthenticationManager used by Spring Security. For example, you may need to simply disable credential erasure for cached users.
To do this, you can take advantage of the fact that the AuthenticationManagerBuilder used to build Spring Security’s global AuthenticationManager is published as a bean. You can configure the builder as follows:
@Configuration
@EnableWebSecurity
public class SecurityConfig {

    @Bean
    public SecurityFilterChain securityFilterChain(HttpSecurity http) throws Exception {
        // ...
        return http.build();
    }

    @Bean
    public UserDetailsService userDetailsService() {
        // Return a UserDetailsService that caches users
        // ...
    }

    @Autowired
    public void configure(AuthenticationManagerBuilder builder) {
        builder.eraseCredentials(false);
    }

}
Alternatively, you may configure a local AuthenticationManager to override the global one.
@Configuration
@EnableWebSecurity
public class SecurityConfig {

    @Bean
    public SecurityFilterChain securityFilterChain(HttpSecurity http) throws Exception {
        http
            .authorizeHttpRequests((authorize) -> authorize
                .anyRequest().authenticated()
            )
            .httpBasic(Customizer.withDefaults())
            .formLogin(Customizer.withDefaults())
            .authenticationManager(authenticationManager());

        return http.build();
    }

    private AuthenticationManager authenticationManager() {
        DaoAuthenticationProvider authenticationProvider = new DaoAuthenticationProvider();
        authenticationProvider.setUserDetailsService(userDetailsService());
        authenticationProvider.setPasswordEncoder(passwordEncoder());

        ProviderManager providerManager = new ProviderManager(authenticationProvider);
        providerManager.setEraseCredentialsAfterAuthentication(false);

        return providerManager;
    }

    private UserDetailsService userDetailsService() {
        UserDetails userDetails = User.withDefaultPasswordEncoder()
            .username("user")
            .password("password")
            .roles("USER")
            .build();

        return new InMemoryUserDetailsManager(userDetails);
    }

    private PasswordEncoder passwordEncoder() {
        return PasswordEncoderFactories.createDelegatingPasswordEncoder();
    }

}
Reading the Username & Password
Spring Security provides the following built-in mechanisms for reading a username and password from HttpServletRequest:
Form Login
Spring Security provides support for username and password being provided through an HTML form. This section provides details on how form based authentication works within Spring Security.
This section examines how form-based login works within Spring Security. First, we see how the user is redirected to the login form:
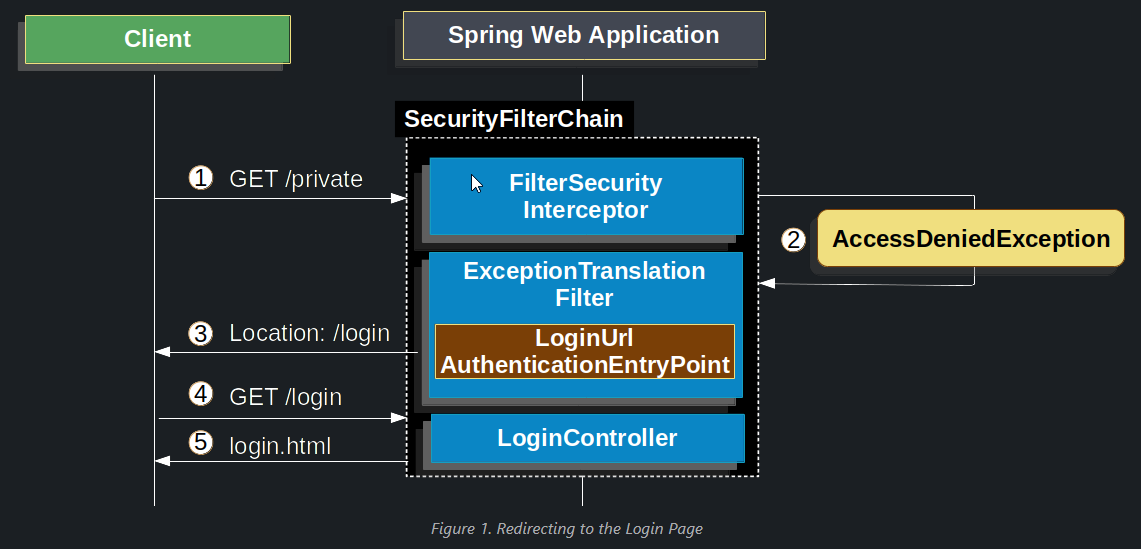
The preceding figure builds off our SecurityFilterChain diagram.
- First, a user makes an unauthenticated request to the resource (
/private) for which it is not authorized. - Spring Security’s
AuthorizationFilterindicates that the unauthenticated request is Denied by throwing anAccessDeniedException. - Since the user is not authenticated,
ExceptionTranslationFilterinitiates Start Authentication and sends a redirect to the login page with the configuredAuthenticationEntryPoint. In most cases, theAuthenticationEntryPointis an instance ofLoginUrlAuthenticationEntryPoint. - The browser requests the login page to which it was redirected.
- Something within the application, must render the login page.
When the username and password are submitted, the UsernamePasswordAuthenticationFilter authenticates the username and password. The UsernamePasswordAuthenticationFilter extends AbstractAuthenticationProcessingFilter, so the following diagram should look pretty similar:
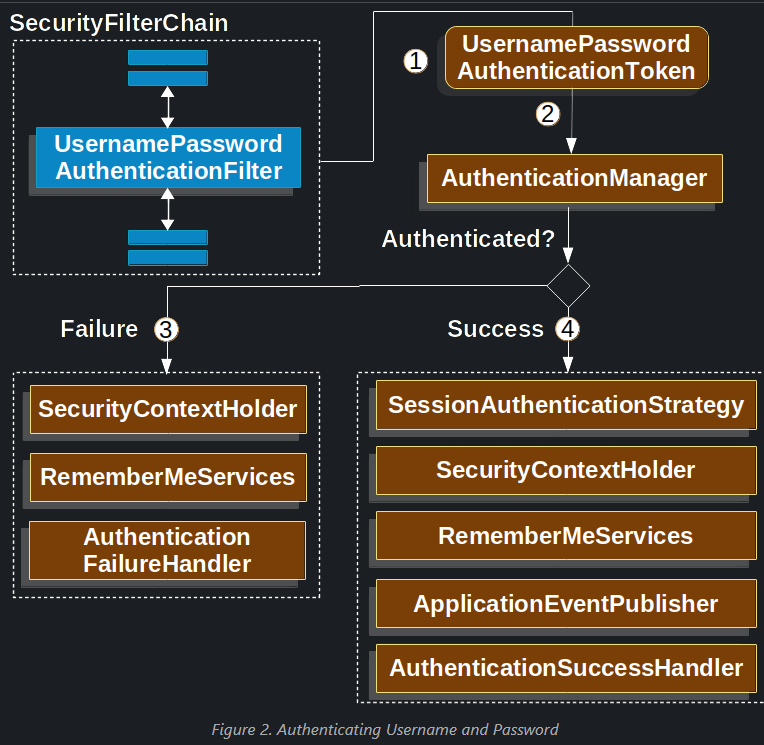
The figure builds off our SecurityFilterChain diagram.
- When the user submits their username and password, the
UsernamePasswordAuthenticationFiltercreates aUsernamePasswordAuthenticationToken, which is a type ofAuthentication, by extracting the username and password from theHttpServletRequestinstance. - Next, the
UsernamePasswordAuthenticationTokenis passed into theAuthenticationManagerinstance to be authenticated. The details of whatAuthenticationManagerlooks like depend on how the user information is stored. - If authentication fails, then Failure.
- The SecurityContextHolder is cleared out.
RememberMeServices.loginFailis invoked. If remember me is not configured, this is a no-op. See theRememberMeServicesinterface in the Javadoc.AuthenticationFailureHandleris invoked. See theAuthenticationFailureHandlerclass in the Javadoc- If authentication is successful, then Success.
SessionAuthenticationStrategyis notified of a new login. See theSessionAuthenticationStrategyinterface in the Javadoc.- The Authentication is set on the SecurityContextHolder. See the
SecurityContextPersistenceFilterclass in the Javadoc. RememberMeServices.loginSuccessis invoked. If remember me is not configured, this is a no-op. See theRememberMeServicesinterface in the Javadoc.ApplicationEventPublisherpublishes anInteractiveAuthenticationSuccessEvent.- The
AuthenticationSuccessHandleris invoked. Typically, this is aSimpleUrlAuthenticationSuccessHandler, which redirects to a request saved byExceptionTranslationFilterwhen we redirect to the login page.
By default, Spring Security form login is enabled. However, as soon as any servlet-based configuration is provided, form based login must be explicitly provided. The following example shows a minimal, explicit Java configuration:
public SecurityFilterChain filterChain(HttpSecurity http) {
    http
        .formLogin(withDefaults());
    // ...
}
In the preceding configuration, Spring Security renders a default login page. Most production applications require a custom login form.
The following configuration demonstrates how to provide a custom login form.
public SecurityFilterChain filterChain(HttpSecurity http) {
    http
        .formLogin(form -> form
            .loginPage("/login")
            .permitAll()
        );
    // ...
}
When the login page is specified in the Spring Security configuration, you are responsible for rendering the page. The following Thymeleaf template produces an HTML login form that complies with a login page of /login.:
Login Form - src/main/resources/templates/login.html
<!DOCTYPE html>
<html xmlns="http://www.w3.org/1999/xhtml" xmlns:th="https://www.thymeleaf.org">
    <head>
        <title>Please Log In</title>
    </head>
    <body>
        <h1>Please Log In</h1>
        <div th:if="${param.error}">
            Invalid username and password.</div>
        <div th:if="${param.logout}">
            You have been logged out.</div>
        <form th:action="@{/login}" method="post">
            <div>
            <input type="text" name="username" placeholder="Username"/>
            </div>
            <div>
            <input type="password" name="password" placeholder="Password"/>
            </div>
            <input type="submit" value="Log in" />
        </form>
    </body>
</html>
There are a few key points about the default HTML form:
- The form should perform a
postto/login. - The form needs to include a CSRF Token, which is automatically included by Thymeleaf.
- The form should specify the username in a parameter named
username. - The form should specify the password in a parameter named
password. - If the HTTP parameter named
erroris found, it indicates the user failed to provide a valid username or password. - If the HTTP parameter named
logoutis found, it indicates the user has logged out successfully.
Many users do not need much more than to customize the login page. However, if needed, you can customize everything shown earlier with additional configuration.
If you use Spring MVC, you need a controller that maps GET /login to the login template we created. The following example shows a minimal LoginController:
@Controller
class LoginController {
    @GetMapping("/login")
    String login() {
        return "login";
    }
}
Password Storage Mechanisms
Each of the supported mechanisms for reading a username and password can use any of the supported storage mechanisms:
- Simple Storage with In-Memory Authentication
- Relational Databases with JDBC Authentication
- Custom data stores with UserDetailsService
- LDAP storage with LDAP Authentication
In-Memory Authentication
Spring Security’s InMemoryUserDetailsManager implements UserDetailsService to provide support for username/password based authentication that is stored in memory. InMemoryUserDetailsManager provides management of UserDetails by implementing the UserDetailsManager interface. UserDetails-based authentication is used by Spring Security when it is configured to accept a username and password for authentication.
In the following sample, we use Spring Boot CLI to encode a password value of password and get the encoded password of {bcrypt}$2a$10$GRLdNijSQMUvl/au9ofL.eDwmoohzzS7.rmNSJZ.0FxO/BTk76klW:
@Bean
public UserDetailsService users() {
    UserDetails user = User.builder()
        .username("user")
        .password("{bcrypt}$2a$10$GRLdNijSQMUvl/au9ofL.eDwmoohzzS7.rmNSJZ.0FxO/BTk76klW")
        .roles("USER")
        .build();
    UserDetails admin = User.builder()
        .username("admin")
        .password("{bcrypt}$2a$10$GRLdNijSQMUvl/au9ofL.eDwmoohzzS7.rmNSJZ.0FxO/BTk76klW")
        .roles("USER", "ADMIN")
        .build();
    return new InMemoryUserDetailsManager(user, admin);
}
The preceding samples store the passwords in a secure format but leave a lot to be desired in terms of a getting started experience.
In the following sample, we use User.withDefaultPasswordEncoder to ensure that the password stored in memory is protected. However, it does not protect against obtaining the password by decompiling the source code. For this reason, User.withDefaultPasswordEncoder should only be used for “getting started” and is not intended for production.
@Bean
public UserDetailsService users() {
    // The builder will ensure the passwords are encoded before saving in memory
    UserBuilder users = User.withDefaultPasswordEncoder();
    UserDetails user = users
        .username("user")
        .password("password")
        .roles("USER")
        .build();
    UserDetails admin = users
        .username("admin")
        .password("password")
        .roles("USER", "ADMIN")
        .build();
    return new InMemoryUserDetailsManager(user, admin);
}
UserDetails
UserDetails is returned by the UserDetailsService. The DaoAuthenticationProvider validates the UserDetails and then returns an Authentication that has a principal that is the UserDetails returned by the configured UserDetailsService.
UserDetailsService
UserDetailsService is used by DaoAuthenticationProvider for retrieving a username, a password, and other attributes for authenticating with a username and password. Spring Security provides in-memory, JDBC, and caching implementations of UserDetailsService.
You can define custom authentication by exposing a custom UserDetailsService as a bean. For example, the following listing customizes authentication, assuming that CustomUserDetailsService implements UserDetailsService:
@Bean
CustomUserDetailsService customUserDetailsService() {
    return new CustomUserDetailsService();
}
PasswordEncoder
Spring Security’s servlet support includes storing passwords securely by integrating with PasswordEncoder. You can customize the PasswordEncoder implementation used by Spring Security by exposing a PasswordEncoder Bean.
DaoAuthenticationProvider
DaoAuthenticationProvider is an AuthenticationProvider implementation that uses a UserDetailsService and PasswordEncoder to authenticate a username and password.
This section examines how DaoAuthenticationProvider works within Spring Security. The following figure explains the workings of the AuthenticationManager in figures from the Reading the Username & Password section.
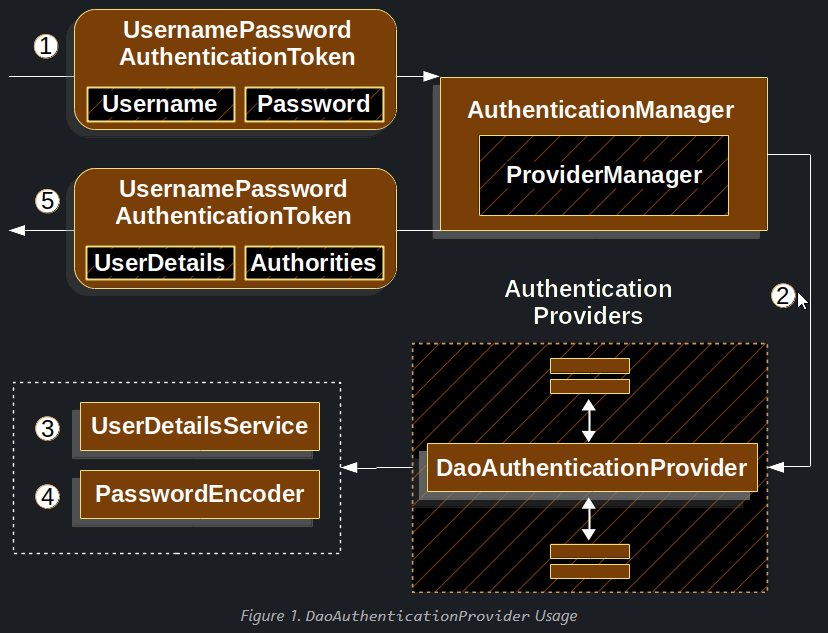
- The authentication
Filterfrom the Reading the Username & Password section passes aUsernamePasswordAuthenticationTokento theAuthenticationManager, which is implemented byProviderManager. - The
ProviderManageris configured to use an AuthenticationProvider of typeDaoAuthenticationProvider. DaoAuthenticationProviderlooks up theUserDetailsfrom theUserDetailsService.DaoAuthenticationProvideruses thePasswordEncoderto validate the password on theUserDetailsreturned in the previous step.- When authentication is successful, the
Authenticationthat is returned is of typeUsernamePasswordAuthenticationTokenand has a principal that is theUserDetailsreturned by the configuredUserDetailsService. Ultimately, the returnedUsernamePasswordAuthenticationTokenis set on theSecurityContextHolderby the authenticationFilter.
Persisting Authentication
The first time a user requests a protected resource, they are prompted for credentials. One of the most common ways to prompt for credentials is to redirect the user to a log in page. A summarized HTTP exchange for an unauthenticated user requesting a protected resource might look like this:
Example 1. Unauthenticated User Requests Protected Resource
GET / HTTP/1.1
Host: example.com
Cookie: SESSION=91470ce0-3f3c-455b-b7ad-079b02290f7b
HTTP/1.1 302 Found
Location: /login
The user submits their username and password.
Username and Password Submitted
POST /login HTTP/1.1
Host: example.com
Cookie: SESSION=91470ce0-3f3c-455b-b7ad-079b02290f7b

username=user&password=password&_csrf=35942e65-a172-4cd4-a1d4-d16a51147b3e
Upon authenticating the user, the user is associated to a new session id to prevent session fixation attacks.
Authenticated User is Associated to New Session
HTTP/1.1 302 Found
Location: /
Set-Cookie: SESSION=4c66e474-3f5a-43ed-8e48-cc1d8cb1d1c8; Path=/; HttpOnly; SameSite=Lax
Subsequent requests include the session cookie which is used to authenticate the user for the remainder of the session.
Authenticated Session Provided as Credentials
GET / HTTP/1.1
Host: example.com
Cookie: SESSION=4c66e474-3f5a-43ed-8e48-cc1d8cb1d1c8
Authentication Events
For each authentication that succeeds or fails, a AuthenticationSuccessEvent or AuthenticationFailureEvent, respectively, is fired.
To listen for these events, you must first publish an AuthenticationEventPublisher. Spring Security’s DefaultAuthenticationEventPublisher works fine for this purpose:
@Bean
public AuthenticationEventPublisher authenticationEventPublisher
        (ApplicationEventPublisher applicationEventPublisher) {
    return new DefaultAuthenticationEventPublisher(applicationEventPublisher);
}
Then you can use Spring’s @EventListener support:
@Component
public class AuthenticationEvents {
    @EventListener
    public void onSuccess(AuthenticationSuccessEvent success) {
        // ...
    }

    @EventListener
    public void onFailure(AbstractAuthenticationFailureEvent failures) {
        // ...
    }
}
Adding Exception Mappings
By default, DefaultAuthenticationEventPublisher publishes an AuthenticationFailureEvent for the following events:
| Exception | Event |
BadCredentialsException |
AuthenticationFailureBadCredentialsEvent |
UsernameNotFoundException |
AuthenticationFailureBadCredentialsEvent |
AccountExpiredException |
AuthenticationFailureExpiredEvent |
ProviderNotFoundException |
AuthenticationFailureProviderNotFoundEvent |
DisabledException |
AuthenticationFailureDisabledEvent |
LockedException |
AuthenticationFailureLockedEvent |
AuthenticationServiceException |
AuthenticationFailureServiceExceptionEvent |
CredentialsExpiredException |
AuthenticationFailureCredentialsExpiredEvent |
InvalidBearerTokenException |
AuthenticationFailureBadCredentialsEvent |
The publisher does an exact Exception match, which means that sub-classes of these exceptions do not also produce events.
Authorization
https://docs.spring.io/spring-security/reference/6.3/servlet/authorization/index.html
Authorization Architecture
This section describes the Spring Security architecture that applies to authorization.
Authorities
Authentication discusses how all Authentication implementations store a list of GrantedAuthority objects. These represent the authorities that have been granted to the principal. The GrantedAuthority objects are inserted into the Authentication object by the AuthenticationManager and are later read by AccessDecisionManager instances when making authorization decisions.
The GrantedAuthority interface has only one method:
String getAuthority();
This method is used by an AuthorizationManager instance to obtain a precise String representation of the GrantedAuthority. By returning a representation as a String, a GrantedAuthority can be easily "read" by most AuthorizationManager implementations. If a GrantedAuthority cannot be precisely represented as a String, the GrantedAuthority is considered "complex" and getAuthority() must return null.
Spring Security includes one concrete GrantedAuthority implementation: SimpleGrantedAuthority. This implementation lets any user-specified String be converted into a GrantedAuthority. All AuthenticationProvider instances included with the security architecture use SimpleGrantedAuthority to populate the Authentication object.
By default, role-based authorization rules include ROLE_ as a prefix. This means that if there is an authorization rule that requires a security context to have a role of "USER", Spring Security will by default look for a GrantedAuthority#getAuthority that returns "ROLE_USER".
You can customize this with GrantedAuthorityDefaults. GrantedAuthorityDefaults exists to allow customizing the prefix to use for role-based authorization rules.
You can configure the authorization rules to use a different prefix by exposing a GrantedAuthorityDefaults bean, like so:
@Bean
static GrantedAuthorityDefaults grantedAuthorityDefaults() {
    return new GrantedAuthorityDefaults("MYPREFIX_");
}
You expose GrantedAuthorityDefaults using a static method to ensure that Spring publishes it before it initializes Spring Security’s method security @Configuration classes
Invocation Handling
Spring Security provides interceptors that control access to secure objects, such as method invocations or web requests. A pre-invocation decision on whether the invocation is allowed to proceed is made by AuthorizationManager instances. Also post-invocation decisions on whether a given value may be returned is made by AuthorizationManager instances.
The AuthorizationManager
AuthorizationManager supersedes both AccessDecisionManager and AccessDecisionVoter.
Applications that customize an AccessDecisionManager or AccessDecisionVoter are encouraged to change to using AuthorizationManager.
AuthorizationManagers are called by Spring Security’s request-based, method-based, and message-based authorization components and are responsible for making final access control decisions. The AuthorizationManager interface contains two methods:
AuthorizationDecision check(Supplier<Authentication> authentication, Object secureObject);

default void verify(Supplier<Authentication> authentication, Object secureObject)
        throws AccessDeniedException {
    // ...
}
The AuthorizationManager's check method is passed all the relevant information it needs in order to make an authorization decision. In particular, passing the secure Object enables those arguments contained in the actual secure object invocation to be inspected. For example, let’s assume the secure object was a MethodInvocation. It would be easy to query the MethodInvocation for any Customer argument, and then implement some sort of security logic in the AuthorizationManager to ensure the principal is permitted to operate on that customer. Implementations are expected to return a positive AuthorizationDecision if access is granted, negative AuthorizationDecision if access is denied, and a null AuthorizationDecision when abstaining from making a decision.
verify calls check and subsequently throws an AccessDeniedException in the case of a negative AuthorizationDecision.
Delegate-based AuthorizationManager Implementations
Whilst users can implement their own AuthorizationManager to control all aspects of authorization, Spring Security ships with a delegating AuthorizationManager that can collaborate with individual AuthorizationManagers.
RequestMatcherDelegatingAuthorizationManager will match the request with the most appropriate delegate AuthorizationManager. For method security, you can use AuthorizationManagerBeforeMethodInterceptor and AuthorizationManagerAfterMethodInterceptor.
Authorization Manager Implementations illustrates the relevant classes.
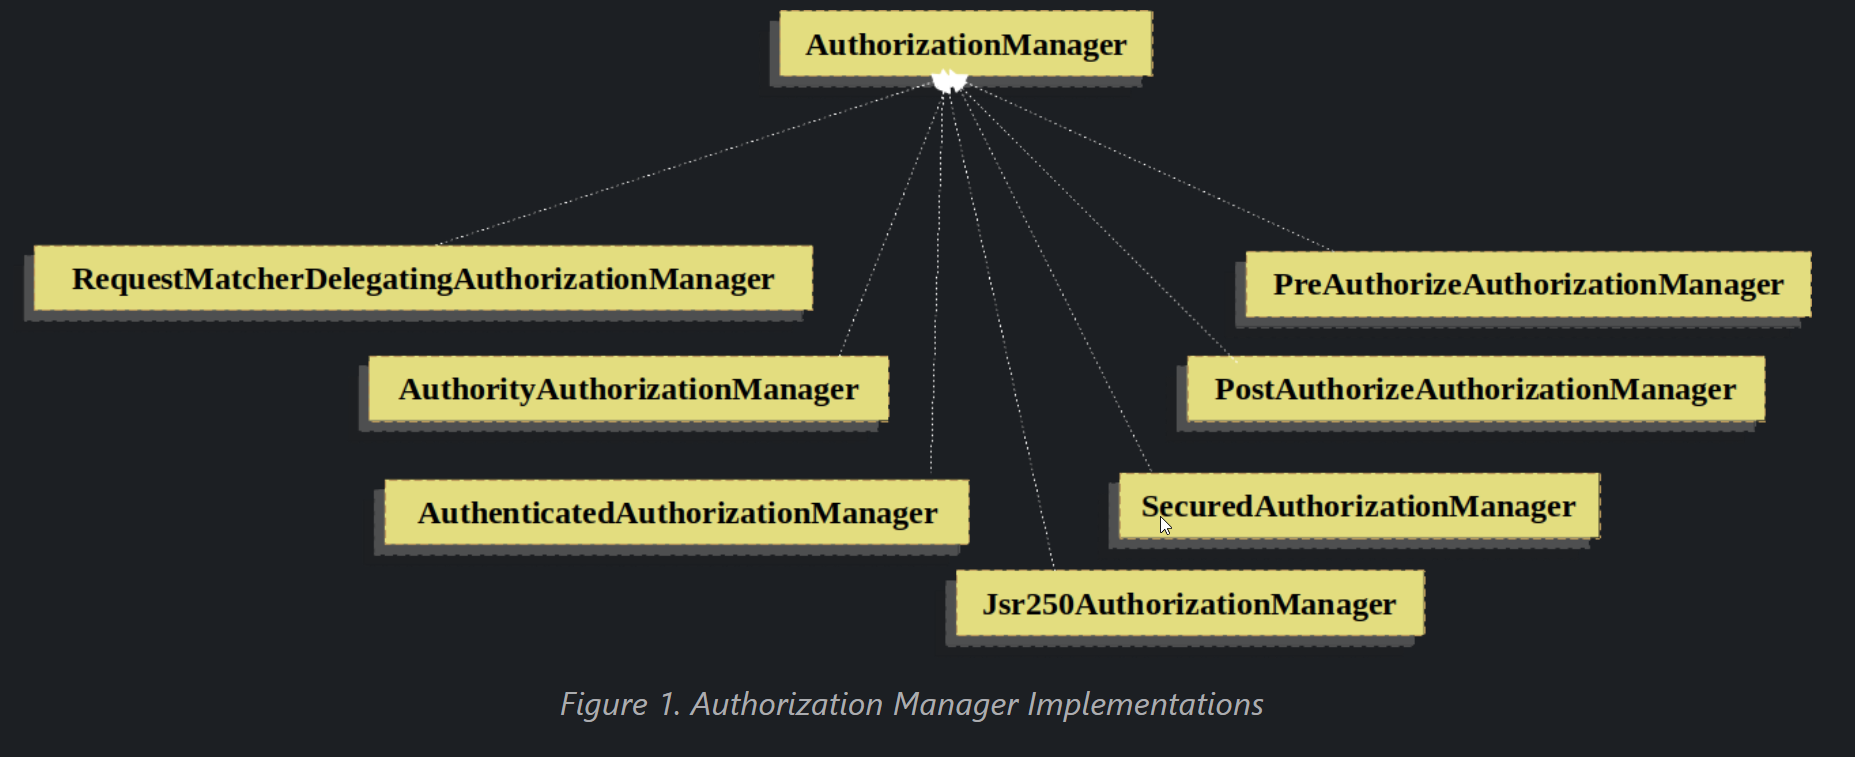
Using this approach, a composition of AuthorizationManager implementations can be polled on an authorization decision.
AuthorityAuthorizationManager
The most common AuthorizationManager provided with Spring Security is AuthorityAuthorizationManager. It is configured with a given set of authorities to look for on the current Authentication. It will return positive AuthorizationDecision should the Authentication contain any of the configured authorities. It will return a negative AuthorizationDecision otherwise.
AuthenticatedAuthorizationManager
Another manager is the AuthenticatedAuthorizationManager. It can be used to differentiate between anonymous, fully-authenticated and remember-me authenticated users. Many sites allow certain limited access under remember-me authentication, but require a user to confirm their identity by logging in for full access.
AuthorizationManagers
There are also helpful static factories in AuthorizationManagers for composing individual AuthorizationManagers into more sophisticated expressions.
Custom Authorization Managers
Obviously, you can also implement a custom AuthorizationManager and you can put just about any access-control logic you want in it. It might be specific to your application (business-logic related) or it might implement some security administration logic. For example, you can create an implementation that can query Open Policy Agent or your own authorization database.
Hierarchical Roles
It is a common requirement that a particular role in an application should automatically "include" other roles. For example, in an application which has the concept of an "admin" and a "user" role, you may want an admin to be able to do everything a normal user can. To achieve this, you can either make sure that all admin users are also assigned the "user" role. Alternatively, you can modify every access constraint which requires the "user" role to also include the "admin" role. This can get quite complicated if you have a lot of different roles in your application.
The use of a role-hierarchy allows you to configure which roles (or authorities) should include others. This is supported for filter-based authorization in HttpSecurity#authorizeHttpRequests and for method-based authorization through DefaultMethodSecurityExpressionHandler for pre-post annotations, SecuredAuthorizationManager for @Secured, and Jsr250AuthorizationManager for JSR-250 annotations. You can configure the behavior for all of them at once in the following way:
@Bean
static RoleHierarchy roleHierarchy() {
    return RoleHierarchyImpl.withDefaultRolePrefix()
        .role("ADMIN").implies("STAFF")
        .role("STAFF").implies("USER")
        .role("USER").implies("GUEST")
        .build();
}

// and, if using pre-post method security also add
@Bean
static MethodSecurityExpressionHandler methodSecurityExpressionHandler(RoleHierarchy roleHierarchy) {
    DefaultMethodSecurityExpressionHandler expressionHandler = new DefaultMethodSecurityExpressionHandler();
    expressionHandler.setRoleHierarchy(roleHierarchy);
    return expressionHandler;
}
Here we have four roles in a hierarchy ROLE_ADMIN ⇒ ROLE_STAFF ⇒ ROLE_USER ⇒ ROLE_GUEST. A user who is authenticated with ROLE_ADMIN, will behave as if they have all four roles when security constraints are evaluated against any filter- or method-based rules.
The > symbol can be thought of as meaning "includes".
Role hierarchies offer a convenient means of simplifying the access-control configuration data for your application and/or reducing the number of authorities which you need to assign to a user. For more complex requirements you may wish to define a logical mapping between the specific access-rights your application requires and the roles that are assigned to users, translating between the two when loading the user information.
Authorize HTTP Requests
Authorize HttpServletRequests
Spring Security allows you to model your authorization at the request level. For example, with Spring Security you can say that all pages under /admin require one authority while all other pages simply require authentication.
By default, Spring Security requires that every request be authenticated. That said, any time you use an HttpSecurity instance, it’s necessary to declare your authorization rules.
Whenever you have an HttpSecurity instance, you should at least do:
http
    .authorizeHttpRequests((authorize) -> authorize
        .anyRequest().authenticated()
    )
This tells Spring Security that any endpoint in your application requires that the security context at a minimum be authenticated in order to allow it.
In many cases, your authorization rules will be more sophisticated than that, so please consider the following use cases:
- I have an app that uses
authorizeRequestsand I want to migrate it toauthorizeHttpRequests - I want to understand how the
AuthorizationFiltercomponents work - I want to match requests based on a pattern; specifically regex
- I want to match request, and I map Spring MVC to something other than the default servlet
- I want to authorize requests
- I want to match a request programmatically
- I want to authorize a request programmatically
- I want to delegate request authorization to a policy agent
-
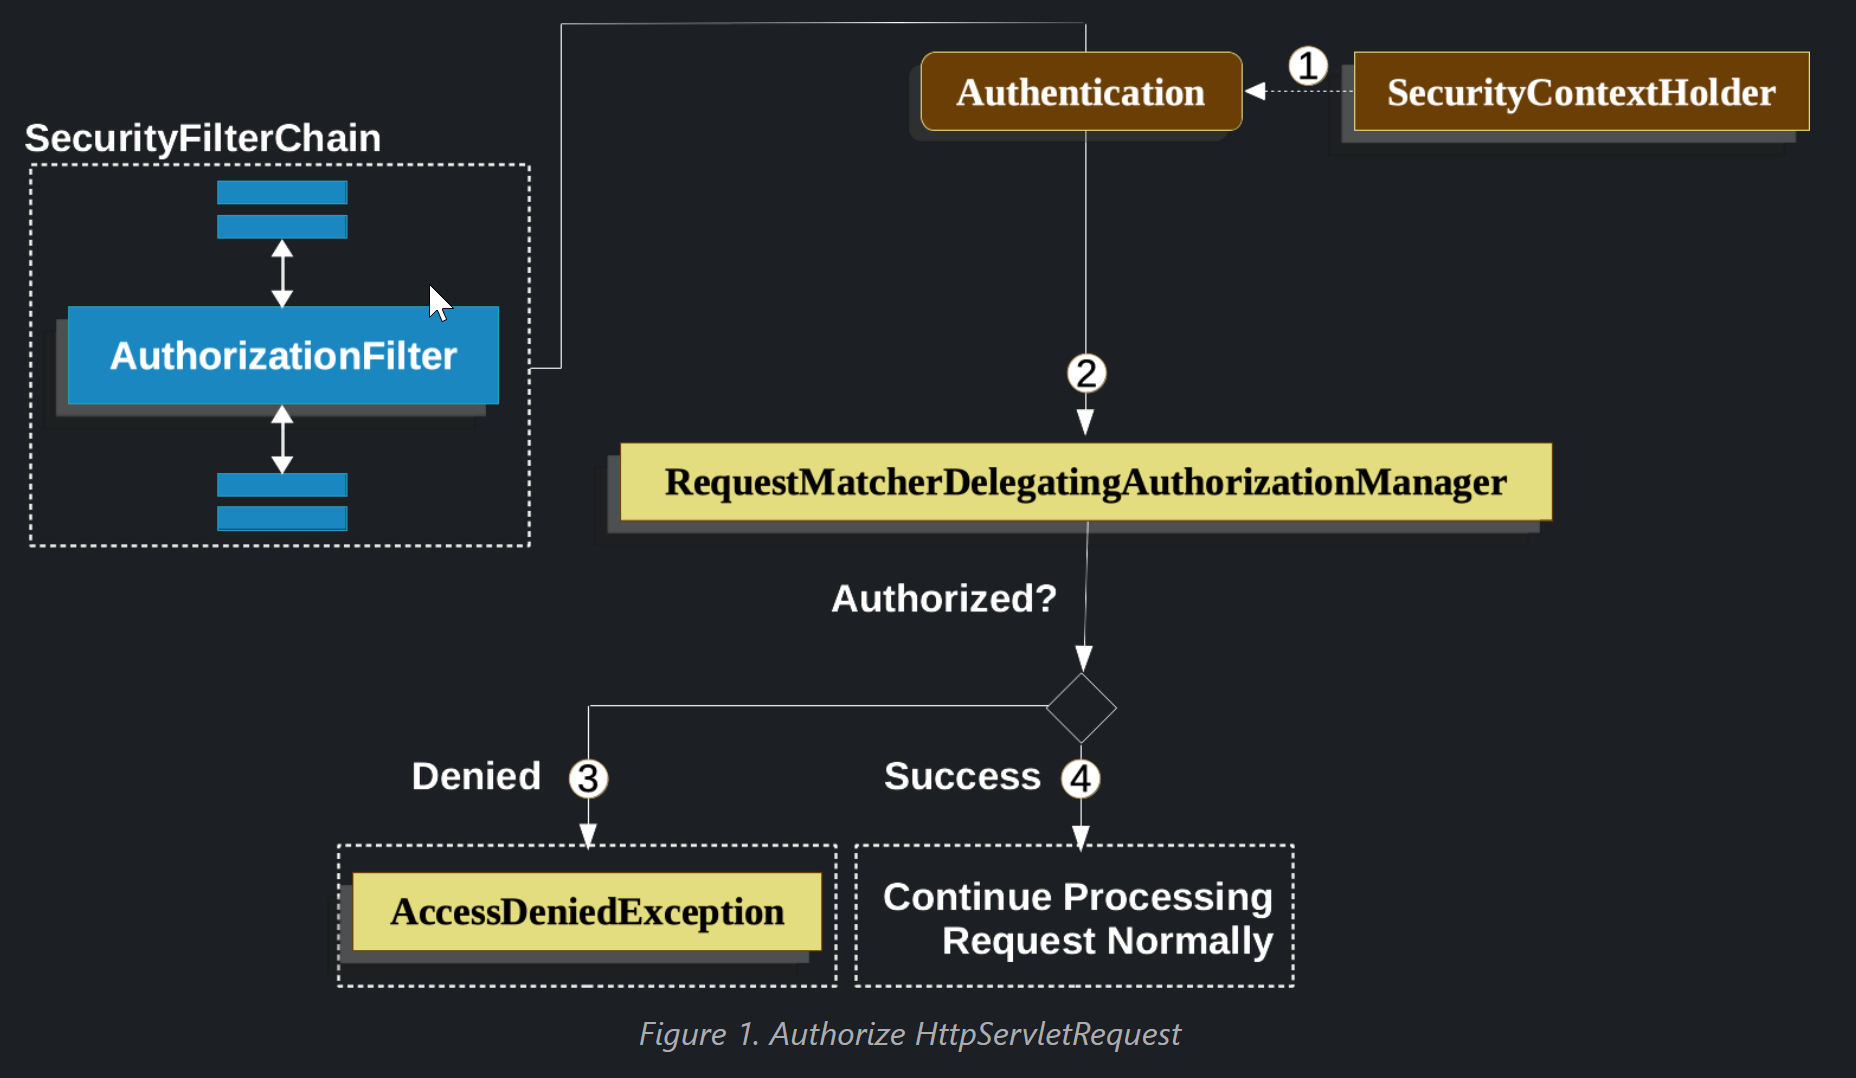
- First, the
AuthorizationFilterconstructs aSupplierthat retrieves an Authentication from the SecurityContextHolder.
- First, the
-
- Second, it passes the
Supplier<Authentication>and theHttpServletRequestto theAuthorizationManager. TheAuthorizationManagermatches the request to the patterns inauthorizeHttpRequests, and runs the corresponding rule.
-
- If authorization is denied, an
AuthorizationDeniedEventis published, and anAccessDeniedExceptionis thrown. In this case theExceptionTranslationFilterhandles theAccessDeniedException.
- If authorization is denied, an
-
- If access is granted, an
AuthorizationGrantedEventis published andAuthorizationFiltercontinues with the FilterChain which allows the application to process normally.
- If access is granted, an
- Second, it passes the
AuthorizationFilter Is Last By Default
The AuthorizationFilter is last in the Spring Security filter chain by default. This means that Spring Security’s authentication filters, exploit protections, and other filter integrations do not require authorization. If you add filters of your own before the AuthorizationFilter, they will also not require authorization; otherwise, they will.
A place where this typically becomes important is when you are adding Spring MVC endpoints. Because they are executed by the DispatcherServlet and this comes after the AuthorizationFilter, your endpoints need to be included in authorizeHttpRequests to be permitted.
All Dispatches Are Authorized
The AuthorizationFilter runs not just on every request, but on every dispatch. This means that the REQUEST dispatch needs authorization, but also FORWARDs, ERRORs, and INCLUDEs.
For example, Spring MVC can FORWARD the request to a view resolver that renders a Thymeleaf template, like so:
@Controller
public class MyController {
    @GetMapping("/endpoint")
    public String endpoint() {
        return "endpoint";
    }
}
In this case, authorization happens twice; once for authorizing /endpoint and once for forwarding to Thymeleaf to render the "endpoint" template.
For that reason, you may want to permit all FORWARD dispatches.
Another example of this principle is how Spring Boot handles errors. If the container catches an exception, say like the following:
@Controller
public class MyController {
    @GetMapping("/endpoint")
    public String endpoint() {
        throw new UnsupportedOperationException("unsupported");
    }
}
then Boot will dispatch it to the ERROR dispatch.
In that case, authorization also happens twice; once for authorizing /endpoint and once for dispatching the error.
For that reason, you may want to permit all ERROR dispatches.
Authentication Lookup is Deferred
Remember that the AuthorizationManager API uses a Supplier<Authentication>.
This matters with authorizeHttpRequests when requests are always permitted or always denied. In those cases, the Authentication is not queried, making for a faster request.
Authorizing an Endpoint
You can configure Spring Security to have different rules by adding more rules in order of precedence.
If you want to require that /endpoint only be accessible by end users with the USER authority, then you can do:
@Bean
public SecurityFilterChain web(HttpSecurity http) throws Exception {
    http
        .authorizeHttpRequests((authorize) -> authorize
        .requestMatchers("/endpoint").hasAuthority("USER")
            .anyRequest().authenticated()
        )
        // ...

    return http.build();
}
As you can see, the declaration can be broken up in to pattern/rule pairs.
AuthorizationFilter processes these pairs in the order listed, applying only the first match to the request. This means that even though /** would also match for /endpoint the above rules are not a problem. The way to read the above rules is "if the request is /endpoint, then require the USER authority; else, only require authentication".
Spring Security supports several patterns and several rules; you can also programmatically create your own of each.
Once authorized, you can test it using Security’s test support in the following way:
@WithMockUser(authorities="USER")
@Test
void endpointWhenUserAuthorityThenAuthorized() {
    this.mvc.perform(get("/endpoint"))
        .andExpect(status().isOk());
}

@WithMockUser
@Test
void endpointWhenNotUserAuthorityThenForbidden() {
    this.mvc.perform(get("/endpoint"))
        .andExpect(status().isForbidden());
}

@Test
void anyWhenUnauthenticatedThenUnauthorized() {
    this.mvc.perform(get("/any"))
        .andExpect(status().isUnauthorized());
}
Matching Requests
Above you’ve already seen two ways to match requests.
The first you saw was the simplest, which is to match any request.
The second is to match by a URI pattern. Spring Security supports two languages for URI pattern-matching: Ant (as seen above) and Regular Expressions.
Matching Using Ant
Ant is the default language that Spring Security uses to match requests.
You can use it to match a single endpoint or a directory, and you can even capture placeholders for later use. You can also refine it to match a specific set of HTTP methods.
Let’s say that you instead of wanting to match the /endpoint endpoint, you want to match all endpoints under the /resource directory. In that case, you can do something like the following:
http
    .authorizeHttpRequests((authorize) -> authorize
        .requestMatchers("/resource/**").hasAuthority("USER")
        .anyRequest().authenticated()
    )
The way to read this is "if the request is /resource or some subdirectory, require the USER authority; otherwise, only require authentication"
You can also extract path values from the request, as seen below:
http
    .authorizeHttpRequests((authorize) -> authorize
        .requestMatchers("/resource/{name}").access(new WebExpressionAuthorizationManager("#name == authentication.name"))
        .anyRequest().authenticated()
    )
Matching Using Regular Expressions
Spring Security supports matching requests against a regular expression. This can come in handy if you want to apply more strict matching criteria than ** on a subdirectory.
For example, consider a path that contains the username and the rule that all usernames must be alphanumeric. You can use RegexRequestMatcher to respect this rule, like so:
http
    .authorizeHttpRequests((authorize) -> authorize
        .requestMatchers(RegexRequestMatcher.regexMatcher("/resource/[A-Za-z0-9]+")).hasAuthority("USER")
        .anyRequest().denyAll()
    )
Matching By Http Method
You can also match rules by HTTP method. One place where this is handy is when authorizing by permissions granted, like being granted a read or write privilege.
To require all GETs to have the read permission and all POSTs to have the write permission, you can do something like this:
http
    .authorizeHttpRequests((authorize) -> authorize
        .requestMatchers(HttpMethod.GET).hasAuthority("read")
        .requestMatchers(HttpMethod.POST).hasAuthority("write")
        .anyRequest().denyAll()
    )
These authorization rules should read as: "if the request is a GET, then require read permission; else, if the request is a POST, then require write permission; else, deny the request"
Matching By Dispatcher Type
As stated earlier, Spring Security authorizes all dispatcher types by default. And even though the security context established on the REQUEST dispatch carries over to subsequent dispatches, subtle mismatches can sometimes cause an unexpected AccessDeniedException.
To address that, you can configure Spring Security Java configuration to allow dispatcher types like FORWARD and ERROR, like so:
http
    .authorizeHttpRequests((authorize) -> authorize
        .dispatcherTypeMatchers(DispatcherType.FORWARD, DispatcherType.ERROR).permitAll()
        .requestMatchers("/endpoint").permitAll()
        .anyRequest().denyAll()
    )
Using an MvcRequestMatcher
Generally speaking, you can use requestMatchers(String) as demonstrated above.
However, if you map Spring MVC to a different servlet path, then you need to account for that in your security configuration.
For example, if Spring MVC is mapped to /spring-mvc instead of / (the default), then you may have an endpoint like /spring-mvc/my/controller that you want to authorize.
You need to use MvcRequestMatcher to split the servlet path and the controller path in your configuration like so:
@Bean
MvcRequestMatcher.Builder mvc(HandlerMappingIntrospector introspector) {
    return new MvcRequestMatcher.Builder(introspector).servletPath("/spring-mvc");
}

@Bean
SecurityFilterChain appEndpoints(HttpSecurity http, MvcRequestMatcher.Builder mvc) {
    http
        .authorizeHttpRequests((authorize) -> authorize
            .requestMatchers(mvc.pattern("/my/controller/**")).hasAuthority("controller")
            .anyRequest().authenticated()
        );

    return http.build();
}
This need can arise in at least two different ways:
- If you use the
spring.mvc.servlet.pathBoot property to change the default path (/) to something else - If you register more than one Spring MVC
DispatcherServlet(thus requiring that one of them not be the default path)
Authorizing Requests
Once a request is matched, you can authorize it in several ways already seen like permitAll, denyAll, and hasAuthority.
As a quick summary, here are the authorization rules built into the DSL:
permitAll- The request requires no authorization and is a public endpoint; note that in this case, theAuthenticationis never retrieved from the sessiondenyAll- The request is not allowed under any circumstances; note that in this case, theAuthenticationis never retrieved from the sessionhasAuthority- The request requires that theAuthenticationhave aGrantedAuthoritythat matches the given valuehasRole- A shortcut forhasAuthoritythat prefixesROLE_or whatever is configured as the default prefixhasAnyAuthority- The request requires that theAuthenticationhave aGrantedAuthoritythat matches any of the given valueshasAnyRole- A shortcut forhasAnyAuthoritythat prefixesROLE_or whatever is configured as the default prefixaccess- The request uses this customAuthorizationManagerto determine access
Having now learned the patterns, rules, and how they can be paired together, you should be able to understand what is going on in this more complex example:
import static jakarta.servlet.DispatcherType.*;

import static org.springframework.security.authorization.AuthorizationManagers.allOf;
import static org.springframework.security.authorization.AuthorityAuthorizationManager.hasAuthority;
import static org.springframework.security.authorization.AuthorityAuthorizationManager.hasRole;

@Bean
SecurityFilterChain web(HttpSecurity http) throws Exception {
    http
        // ...
        .authorizeHttpRequests(authorize -> authorize                                  (1)
            .dispatcherTypeMatchers(FORWARD, ERROR).permitAll() (2)
            .requestMatchers("/static/**", "/signup", "/about").permitAll()         (3)
            .requestMatchers("/admin/**").hasRole("ADMIN")                             (4)
            .requestMatchers("/db/**").access(allOf(hasAuthority("db"), hasRole("ADMIN")))   (5)
            .anyRequest().denyAll()                                                (6)
        );

    return http.build();
}
| 1 | There are multiple authorization rules specified. Each rule is considered in the order they were declared. |
|---|---|
| 2 | Dispatches FORWARDand ERRORare permitted to allowSpring MVCto render views and Spring Boot to render errors |
| 3 | We specified multiple URL patterns that any user can access. Specifically, any user can access a request if the URL starts with "/static/", equals "/signup", or equals "/about". |
| 4 | Any URL that starts with "/admin/" will be restricted to users who have the role "ROLE_ADMIN". You will notice that since we are invoking the hasRolemethod we do not need to specify the "ROLE_" prefix. |
| 5 | Any URL that starts with "/db/" requires the user to have both been granted the "db" permission as well as be a "ROLE_ADMIN". You will notice that since we are using the hasRoleexpression we do not need to specify the "ROLE_" prefix. |
| 6 | Any URL that has not already been matched on is denied access. This is a good strategy if you do not want to accidentally forget to update your authorization rules. |
Security Matchers
The RequestMatcher interface is used to determine if a request matches a given rule. We use securityMatchers to determine if a given HttpSecurity should be applied to a given request. The same way, we can use requestMatchers to determine the authorization rules that we should apply to a given request. Look at the following example:
@Configuration
@EnableWebSecurity
public class SecurityConfig {

    @Bean
    public SecurityFilterChain securityFilterChain(HttpSecurity http) throws Exception {
        http
            .securityMatcher("/api/**")      // 1
            .authorizeHttpRequests(authorize -> authorize
                .requestMatchers("/api/user/**").hasRole("USER")  //2
                .requestMatchers("/api/admin/**").hasRole("ADMIN")  //3
                .anyRequest().authenticated()  // 4
            )
            .formLogin(withDefaults());
        return http.build();
    }
}
| 1 | Configure HttpSecurityto only be applied to URLs that start with /api/ |
|---|---|
| 2 | Allow access to URLs that start with /api/user/to users with the USERrole |
| 3 | Allow access to URLs that start with /api/admin/to users with the ADMINrole |
| 4 | Any other request that doesn’t match the rules above, will require authentication |
The securityMatcher(s) and requestMatcher(s) methods will decide which RequestMatcher implementation fits best for your application: If Spring MVC is in the classpath, then MvcRequestMatcher will be used, otherwise, AntPathRequestMatcher will be used. You can read more about the Spring MVC integration here.
If you want to use a specific RequestMatcher, just pass an implementation to the securityMatcher and/or requestMatcher methods:
import static org.springframework.security.web.util.matcher.AntPathRequestMatcher.antMatcher; (1)
import static org.springframework.security.web.util.matcher.RegexRequestMatcher.regexMatcher;

@Configuration
@EnableWebSecurity
public class SecurityConfig {

    @Bean
    public SecurityFilterChain securityFilterChain(HttpSecurity http) throws Exception {
        http
            .securityMatcher(antMatcher("/api/**"))                              (2)
            .authorizeHttpRequests(authorize -> authorize
                .requestMatchers(antMatcher("/api/user/**")).hasRole("USER")     (3)
                .requestMatchers(regexMatcher("/api/admin/.*")).hasRole("ADMIN") (4)
                .requestMatchers(new MyCustomRequestMatcher()).hasRole("SUPERVISOR")     (5)
                .anyRequest().authenticated()
            )
            .formLogin(withDefaults());
        return http.build();
    }
}

public class MyCustomRequestMatcher implements RequestMatcher {

    @Override
    public boolean matches(HttpServletRequest request) {
        // ...
    }
}
| 1 | Import the static factory methods from AntPathRequestMatcherand RegexRequestMatcherto create RequestMatcherinstances. |
|---|---|
| 2 | Configure HttpSecurityto only be applied to URLs that start with /api/, using AntPathRequestMatcher |
| 3 | Allow access to URLs that start with /api/user/to users with the USERrole, using AntPathRequestMatcher |
| 4 | Allow access to URLs that start with /api/admin/to users with the ADMINrole, using RegexRequestMatcher |
| 5 | Allow access to URLs that match the MyCustomRequestMatcherto users with the SUPERVISORrole, using a custom RequestMatcher |
Protection Against Exploits
https://docs.spring.io/spring-security/reference/6.3/servlet/exploits/index.html
Cross Site Request Forgery (CSRF)
In an application where end users can log in, it is important to consider how to protect against Cross Site Request Forgery (CSRF).
Spring Security protects against CSRF attacks by default for unsafe HTTP methods, such as a POST request, so no additional code is necessary. You can specify the default configuration explicitly using the following:
@Configuration
@EnableWebSecurity
public class SecurityConfig {

    @Bean
    public SecurityFilterChain securityFilterChain(HttpSecurity http) throws Exception {
        http
            // ...
            .csrf(Customizer.withDefaults());
        return http.build();
    }
}
Understanding CSRF Protection’s Components
CSRF protection is provided by several components that are composed within the CsrfFilter:
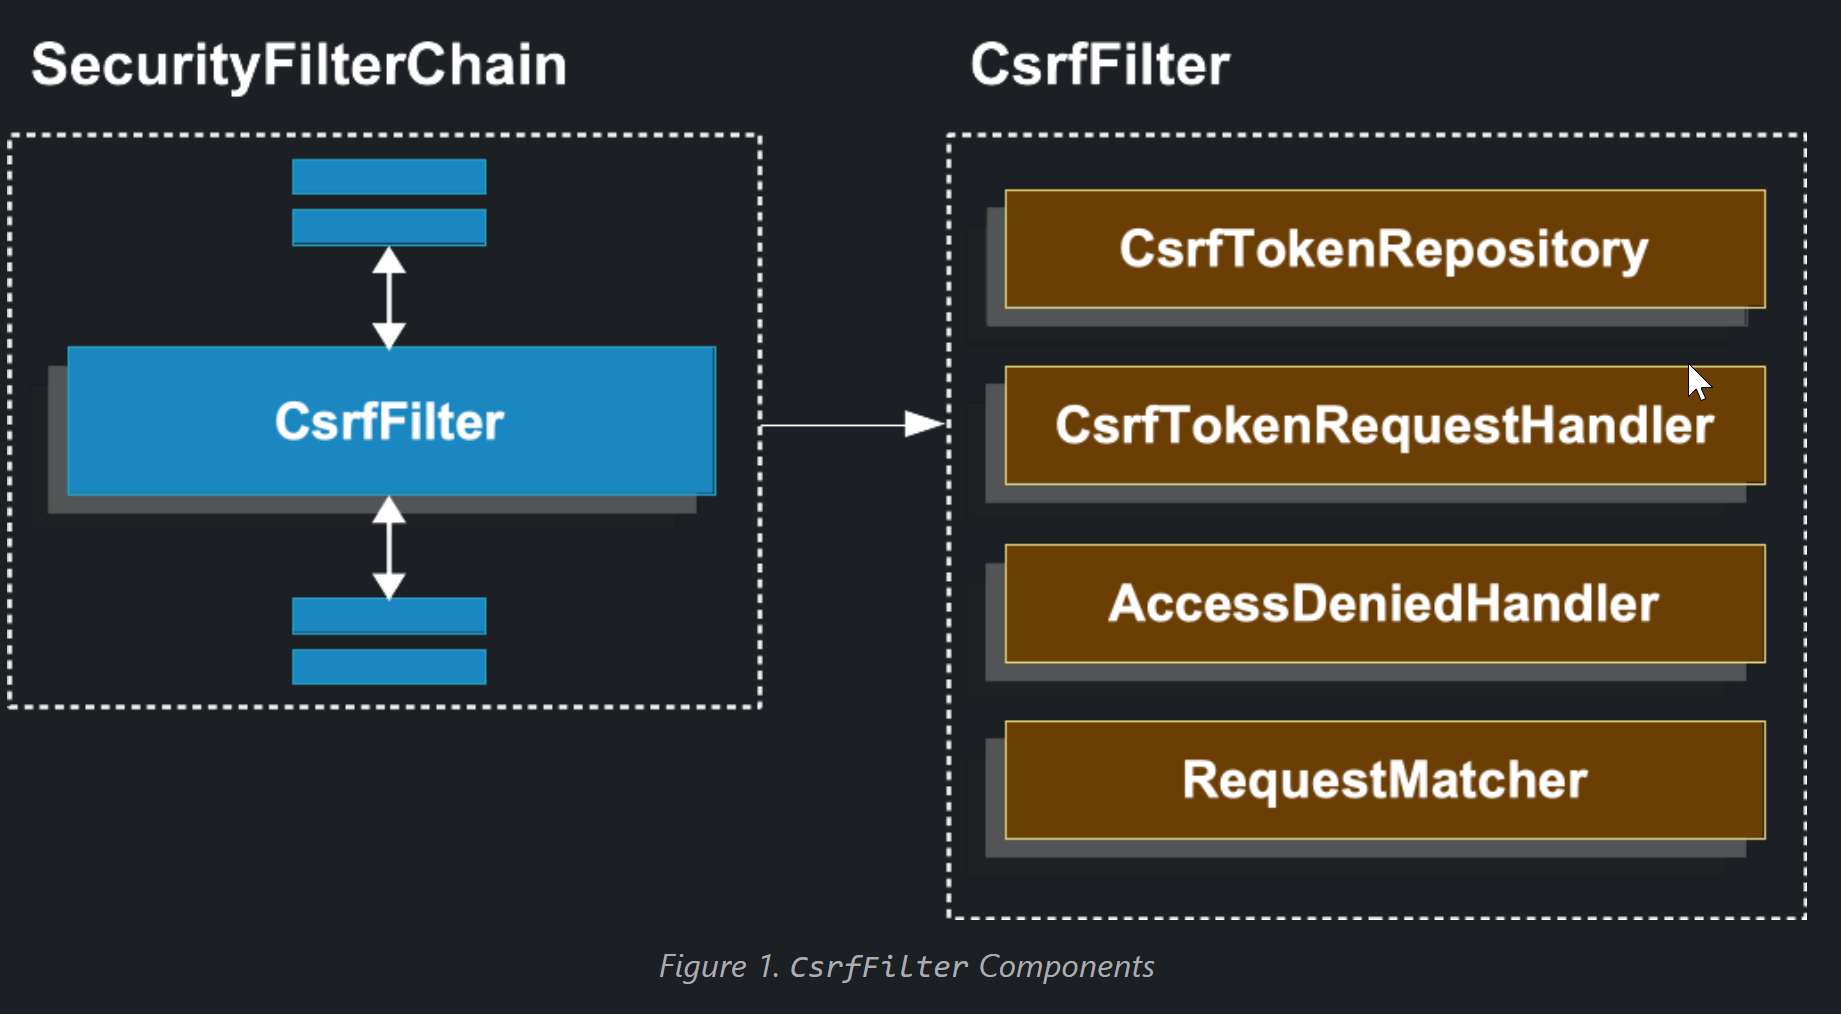
CSRF protection is divided into two parts:
- Make the
CsrfTokenavailable to the application by delegating to theCsrfTokenRequestHandler. - Determine if the request requires CSRF protection, load and validate the token, and handle
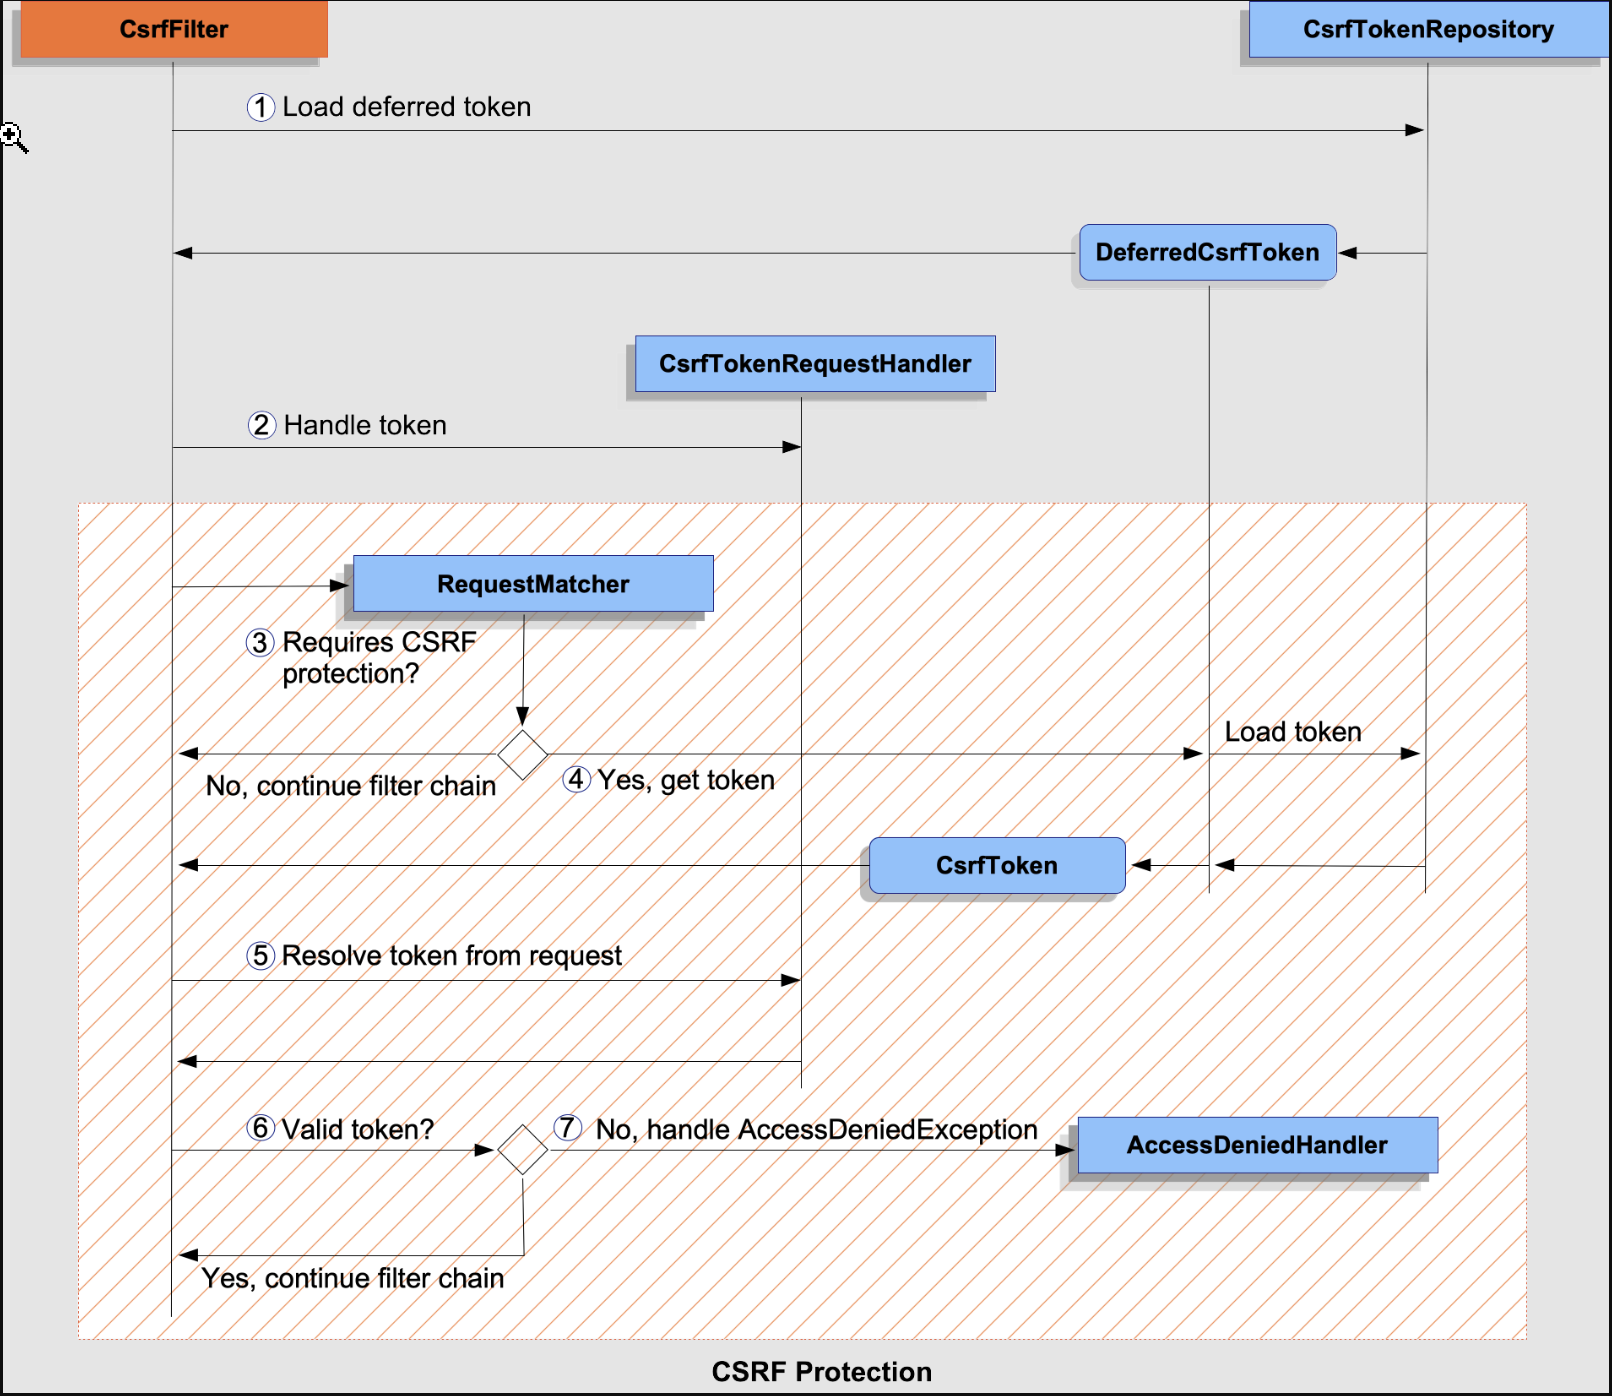
Figure 2. `CsrfFilter` Processing
-
- First, the
DeferredCsrfTokenis loaded, which holds a reference to theCsrfTokenRepositoryso that the persistedCsrfTokencan be loaded later (in 4).
- First, the
-
- Second, a
Supplier<CsrfToken>(created fromDeferredCsrfToken) is given to theCsrfTokenRequestHandler, which is responsible for populating a request attribute to make theCsrfTokenavailable to the rest of the application.
- Second, a
-
- Next, the main CSRF protection processing begins and checks if the current request requires CSRF protection. If not required, the filter chain is continued and processing ends.
-
- If CSRF protection is required, the persisted
CsrfTokenis finally loaded from theDeferredCsrfToken.
- If CSRF protection is required, the persisted
-
- Continuing, the actual CSRF token provided by the client (if any) is resolved using the
CsrfTokenRequestHandler.
- Continuing, the actual CSRF token provided by the client (if any) is resolved using the
-
- The actual CSRF token is compared against the persisted
CsrfToken. If valid, the filter chain is continued and processing ends.
- The actual CSRF token is compared against the persisted
-
- If the actual CSRF token is invalid (or missing), an
AccessDeniedExceptionis passed to theAccessDeniedHandlerand processing ends.
- If the actual CSRF token is invalid (or missing), an
Persisting the CsrfToken
The CsrfToken is persisted using a CsrfTokenRepository.
By default, the HttpSessionCsrfTokenRepository is used for storing tokens in a session. Spring Security also provides the CookieCsrfTokenRepository for storing tokens in a cookie. You can also specify your own implementation to store tokens wherever you like.
Using the HttpSessionCsrfTokenRepository
By default, Spring Security stores the expected CSRF token in the HttpSession by using HttpSessionCsrfTokenRepository, so no additional code is necessary.
The HttpSessionCsrfTokenRepository reads the token from a session (whether in-memory, cache, or database). If you need to access the session attribute directly, please first configure the session attribute name using HttpSessionCsrfTokenRepository#setSessionAttributeName.
You can specify the default configuration explicitly using the following configuration:
@Configuration
@EnableWebSecurity
public class SecurityConfig {

    @Bean
    public SecurityFilterChain securityFilterChain(HttpSecurity http) throws Exception {
        http
            // ...
            .csrf((csrf) -> csrf
                .csrfTokenRepository(new HttpSessionCsrfTokenRepository())
            );
        return http.build();
    }
}
Using the CookieCsrfTokenRepository
You can persist the CsrfToken in a cookie to support a JavaScript-based application using the CookieCsrfTokenRepository.
The CookieCsrfTokenRepository writes to a cookie named XSRF-TOKEN and reads it from an HTTP request header named X-XSRF-TOKEN or the request parameter _csrf by default. These defaults come from Angular and its predecessor AngularJS.
You can configure the CookieCsrfTokenRepository using the following configuration:
@Configuration
@EnableWebSecurity
public class SecurityConfig {

    @Bean
    public SecurityFilterChain securityFilterChain(HttpSecurity http) throws Exception {
        http
            // ...
            .csrf((csrf) -> csrf
                .csrfTokenRepository(CookieCsrfTokenRepository.withHttpOnlyFalse())
            );
        return http.build();
    }
}
The example explicitly sets HttpOnly to false. This is necessary to let JavaScript frameworks (such as Angular) read it. If you do not need the ability to read the cookie with JavaScript directly, we recommend omitting HttpOnly (by using new CookieCsrfTokenRepository() instead) to improve security.
https://v17.angular.io/guide/http-security-xsrf-protection
[HttpClient](https://v17.angular.io/api/common/http/HttpClient) supports a common mechanism used to prevent XSRF attacks. When performing HTTP requests, an interceptor reads a token from a cookie, by default XSRF-TOKEN, and sets it as an HTTP header, X-XSRF-TOKEN. Because only code that runs on your domain could read the cookie, the backend can be certain that the HTTP request came from your client application and not an attacker.
By default, an interceptor sends this header on all mutating requests (such as POST) to relative URLs, but not on GET/HEAD requests or on requests with an absolute URL.
To take advantage of this, your server needs to set a token in a JavaScript readable session cookie called XSRF-TOKEN on either the page load or the first GET request. On subsequent requests the server can verify that the cookie matches the X-XSRF-TOKEN HTTP header, and therefore be sure that only code running on your domain could have sent the request. The token must be unique for each user and must be verifiable by the server; this prevents the client from making up its own tokens. Set the token to a digest of your site's authentication cookie with a salt for added security.
Customizing the CsrfTokenRepository
There can be cases where you want to implement a custom CsrfTokenRepository.
Once you’ve implemented the CsrfTokenRepository interface, you can configure Spring Security to use it with the following configuration:
@Configuration
@EnableWebSecurity
public class SecurityConfig {

    @Bean
    public SecurityFilterChain securityFilterChain(HttpSecurity http) throws Exception {
        http
            // ...
            .csrf((csrf) -> csrf
                .csrfTokenRepository(new CustomCsrfTokenRepository())
            );
        return http.build();
    }
}
Handling the CsrfToken
The CsrfToken is made available to an application using a CsrfTokenRequestHandler. This component is also responsible for resolving the CsrfToken from HTTP headers or request parameters.
By default, the XorCsrfTokenRequestAttributeHandler is used for providing BREACH protection of the CsrfToken. Spring Security also provides the CsrfTokenRequestAttributeHandler for opting out of BREACH protection. You can also specify your own implementation to customize the strategy for handling and resolving tokens.
Using the XorCsrfTokenRequestAttributeHandler (BREACH)
The XorCsrfTokenRequestAttributeHandler makes the CsrfToken available as an HttpServletRequest attribute called _csrf, and additionally provides protection for BREACH.
Note: The CsrfToken is also made available as a request attribute using the name CsrfToken.class.getName(). This name is not configurable, but the name _csrf can be changed using XorCsrfTokenRequestAttributeHandler#setCsrfRequestAttributeName.
This implementation also resolves the token value from the request as either a request header (one of X-CSRF-TOKEN or X-XSRF-TOKEN by default) or a request parameter (_csrf by default).
Note: BREACH protection is provided by encoding randomness into the CSRF token value to ensure the returned CsrfToken changes on every request. When the token is later resolved as a header value or request parameter, it is decoded to obtain the raw token which is then compared to the persisted CsrfToken.
Spring Security protects the CSRF token from a BREACH attack by default, so no additional code is necessary. You can specify the default configuration explicitly using the following configuration:
@Configuration
@EnableWebSecurity
public class SecurityConfig {

    @Bean
    public SecurityFilterChain securityFilterChain(HttpSecurity http) throws Exception {
        http
            // ...
            .csrf((csrf) -> csrf
                .csrfTokenRequestHandler(new XorCsrfTokenRequestAttributeHandler())
            );
        return http.build();
    }
}
Using the CsrfTokenRequestAttributeHandler
The CsrfTokenRequestAttributeHandler makes the CsrfToken available as an HttpServletRequest attribute called _csrf.
This implementation also resolves the token value from the request as either a request header (one of X-CSRF-TOKEN or X-XSRF-TOKEN by default) or a request parameter (_csrf by default).
The primary use of CsrfTokenRequestAttributeHandler is to opt-out of BREACH protection of the CsrfToken, which can be configured using the following configuration:
@Configuration
@EnableWebSecurity
public class SecurityConfig {

    @Bean
    public SecurityFilterChain securityFilterChain(HttpSecurity http) throws Exception {
        http
            // ...
            .csrf((csrf) -> csrf
                .csrfTokenRequestHandler(new CsrfTokenRequestAttributeHandler())
            );
        return http.build();
    }
}
Deferred Loading of the CsrfToken
By default, Spring Security defers loading of the CsrfToken until it is needed.
Note: The CsrfToken is needed whenever a request is made with an unsafe HTTP method, such as a POST. Additionally, it is needed by any request that renders the token to the response, such as a web page with a <form> tag that includes a hidden <input> for the CSRF token.
Because Spring Security also stores the CsrfToken in the HttpSession by default, deferred CSRF tokens can improve performance by not requiring the session to be loaded on every request.
In the event that you want to opt-out of deferred tokens and cause the CsrfToken to be loaded on every request, you can do so with the following configuration:
@Configuration
@EnableWebSecurity
public class SecurityConfig {

    @Bean
    public SecurityFilterChain securityFilterChain(HttpSecurity http) throws Exception {
        XorCsrfTokenRequestAttributeHandler requestHandler = new XorCsrfTokenRequestAttributeHandler();
        // set the name of the attribute the CsrfToken will be populated on
        requestHandler.setCsrfRequestAttributeName(null);
        http
            // ...
            .csrf((csrf) -> csrf
                .csrfTokenRequestHandler(requestHandler)
            );
        return http.build();
    }
}
Note: By setting the csrfRequestAttributeName to null, the CsrfToken must first be loaded to determine what attribute name to use. This causes the CsrfToken to be loaded on every request.
Integrating with CSRF Protection
For the synchronizer token pattern to protect against CSRF attacks, we must include the actual CSRF token in the HTTP request. This must be included in a part of the request (a form parameter, an HTTP header, or other part) that is not automatically included in the HTTP request by the browser.
The following sections describe the various ways a frontend or client application can integrate with a CSRF-protected backend application:
HTML Forms
To submit an HTML form, the CSRF token must be included in the form as a hidden input. For example, the rendered HTML might look like:
CSRF Token in HTML Form
<input type="hidden"
    name="_csrf"
    value="4bfd1575-3ad1-4d21-96c7-4ef2d9f86721"/>
The following view technologies automatically include the actual CSRF token in a form that has an unsafe HTTP method, such as a POST:
- Spring’s form tag library
- Thymeleaf
- Any other view technology that integrates with
RequestDataValueProcessor(viaCsrfRequestDataValueProcessor) - You can also include the token yourself via the csrfInput tag
If these options are not available, you can take advantage of the fact that the CsrfToken is exposed as an HttpServletRequest attribute named _csrf. The following example does this with a JSP:
CSRF Token in HTML Form with Request Attribute
<c:url var="logoutUrl" value="/logout"/>
<form action="${logoutUrl}"
    method="post">
<input type="submit"
    value="Log out" />
<input type="hidden"
    name="${_csrf.parameterName}"
    value="${_csrf.token}"/>
</form>
JavaScript Applications
JavaScript applications typically use JSON instead of HTML. If you use JSON, you can submit the CSRF token within an HTTP request header instead of a request parameter.
In order to obtain the CSRF token, you can configure Spring Security to store the expected CSRF token in a cookie. By storing the expected token in a cookie, JavaScript frameworks such as Angular can automatically include the actual CSRF token as an HTTP request header.
You can read about different types of JavaScript applications in the following sections:
Single-Page Applications
There are special considerations for integrating a single-page application (SPA) with Spring Security’s CSRF protection.
Recall that Spring Security provides BREACH protection of the CsrfToken by default. When storing the expected CSRF token in a cookie, JavaScript applications will only have access to the plain token value and will not have access to the encoded value. A customized request handler for resolving the actual token value will need to be provided.
In addition, the cookie storing the CSRF token will be cleared upon authentication success and logout success. Spring Security defers loading a new CSRF token by default, and additional work is required to return a fresh cookie.
In order to easily integrate a single-page application with Spring Security, the following configuration can be used:
@Configuration
@EnableWebSecurity
public class SecurityConfig {

    @Bean
    public SecurityFilterChain securityFilterChain(HttpSecurity http) throws Exception {
        http
            // ...
            .csrf((csrf) -> csrf
                .csrfTokenRepository(CookieCsrfTokenRepository.withHttpOnlyFalse())
                .csrfTokenRequestHandler(new SpaCsrfTokenRequestHandler())
            )
            .addFilterAfter(new CsrfCookieFilter(), BasicAuthenticationFilter.class);
        return http.build();
    }
}

final class SpaCsrfTokenRequestHandler extends CsrfTokenRequestAttributeHandler {
    private final CsrfTokenRequestHandler delegate = new XorCsrfTokenRequestAttributeHandler();

    @Override
    public void handle(HttpServletRequest request, HttpServletResponse response, Supplier<CsrfToken> csrfToken) {
        /*
         * Always use XorCsrfTokenRequestAttributeHandler to provide BREACH protection of
         * the CsrfToken when it is rendered in the response body.
         */
        this.delegate.handle(request, response, csrfToken);
    }

    @Override
    public String resolveCsrfTokenValue(HttpServletRequest request, CsrfToken csrfToken) {
        /*
         * If the request contains a request header, use CsrfTokenRequestAttributeHandler
         * to resolve the CsrfToken. This applies when a single-page application includes
         * the header value automatically, which was obtained via a cookie containing the
         * raw CsrfToken.
         */
        if (StringUtils.hasText(request.getHeader(csrfToken.getHeaderName()))) {
            return super.resolveCsrfTokenValue(request, csrfToken);
        }
        /*
         * In all other cases (e.g. if the request contains a request parameter), use
         * XorCsrfTokenRequestAttributeHandler to resolve the CsrfToken. This applies
         * when a server-side rendered form includes the _csrf request parameter as a
         * hidden input.
         */
        return this.delegate.resolveCsrfTokenValue(request, csrfToken);
    }
}

final class CsrfCookieFilter extends OncePerRequestFilter {

    @Override
    protected void doFilterInternal(HttpServletRequest request, HttpServletResponse response, FilterChain filterChain)
            throws ServletException, IOException {
        CsrfToken csrfToken = (CsrfToken) request.getAttribute("_csrf");
        // Render the token value to a cookie by causing the deferred token to be loaded
        csrfToken.getToken();

        filterChain.doFilter(request, response);
    }
}
| 1 | Configure CookieCsrfTokenRepositorywith HttpOnlyset to falseso the cookie can be read by the JavaScript application. |
|---|---|
| 2 | Configure a custom CsrfTokenRequestHandlerthat resolves the CSRF token based on whether it is an HTTP request header (X-XSRF-TOKEN) or request parameter (_csrf). |
| 3 | Configure a custom Filterto load the CsrfTokenon every request, which will return a new cookie if needed. |
Multi-Page Applications
For multi-page applications where JavaScript is loaded on each page, an alternative to exposing the CSRF token in a cookie is to include the CSRF token within your meta tags. The HTML might look something like this:
CSRF Token in HTML Meta Tag
<html>
<head>
    <meta name="_csrf" content="4bfd1575-3ad1-4d21-96c7-4ef2d9f86721"/>
    <meta name="_csrf_header" content="X-CSRF-TOKEN"/>
    <!-- ... -->
</head>
<!-- ... -->
</html>
In order to include the CSRF token in the request, you can take advantage of the fact that the CsrfToken is exposed as an HttpServletRequest attribute named _csrf. The following example does this with a JSP:
CSRF Token in HTML Meta Tag with Request Attribute
<html>
<head>
    <meta name="_csrf" content="${_csrf.token}"/>
    <!-- default header name is X-CSRF-TOKEN -->
    <meta name="_csrf_header" content="${_csrf.headerName}"/>
    <!-- ... -->
</head>
<!-- ... -->
</html>
Once the meta tags contain the CSRF token, the JavaScript code can read the meta tags and include the CSRF token as a header. If you use jQuery, you can do this with the following code:
Include CSRF Token in AJAX Request
$(function () {
    var token = $("meta[name='_csrf']").attr("content");
    var header = $("meta[name='_csrf_header']").attr("content");
    $(document).ajaxSend(function(e, xhr, options) {
        xhr.setRequestHeader(header, token);
    });
});
Disable CSRF Protection
By default, CSRF protection is enabled, which affects integrating with the backend and testing your application. Before disabling CSRF protection, consider whether it makes sense for your application.
You can also consider whether only certain endpoints do not require CSRF protection and configure an ignoring rule, as in the following example:
@Configuration
@EnableWebSecurity
public class SecurityConfig {

    @Bean
    public SecurityFilterChain securityFilterChain(HttpSecurity http) throws Exception {
        http
            // ...
            .csrf((csrf) -> csrf
                .ignoringRequestMatchers("/api/*")
            );
        return http.build();
    }
}
If you need to disable CSRF protection, you can do so using the following configuration:
@Configuration
@EnableWebSecurity
public class SecurityConfig {

    @Bean
    public SecurityFilterChain securityFilterChain(HttpSecurity http) throws Exception {
        http
            // ...
            .csrf((csrf) -> csrf.disable());
        return http.build();
    }
}
Java Configuration
https://docs.spring.io/spring-security/reference/6.3/servlet/configuration/java.html
Hello Web Security Java Configuration
The first step is to create our Spring Security Java Configuration. The configuration creates a Servlet Filter known as the springSecurityFilterChain, which is responsible for all the security (protecting the application URLs, validating submitted username and passwords, redirecting to the log in form, and so on) within your application. The following example shows the most basic example of a Spring Security Java Configuration:
import org.springframework.beans.factory.annotation.Autowired;

import org.springframework.context.annotation.*;
import org.springframework.security.config.annotation.authentication.builders.*;
import org.springframework.security.config.annotation.web.configuration.*;

@Configuration
@EnableWebSecurity
public class WebSecurityConfig {

    @Bean
    public UserDetailsService userDetailsService() {
        InMemoryUserDetailsManager manager = new InMemoryUserDetailsManager();
        manager.createUser(User.withDefaultPasswordEncoder().username("user").password("password").roles("USER").build());
        return manager;
    }
}
This configuration is not complex or extensive, but it does a lot:
- Require authentication to every URL in your application
- Generate a login form for you
- Let the user with a Username of
userand a Password ofpasswordauthenticate with form based authentication - Let the user logout
- CSRF attack prevention
- Session Fixation protection
- Security Header integration:
- HTTP Strict Transport Security for secure requests
- X-Content-Type-Options integration
- Cache Control (which you can override later in your application to allow caching of your static resources)
- X-XSS-Protection integration
- X-Frame-Options integration to help prevent Clickjacking
- Integration with the following Servlet API methods:
HttpSecurity
Thus far, our WebSecurityConfig contains only information about how to authenticate our users. How does Spring Security know that we want to require all users to be authenticated? How does Spring Security know we want to support form-based authentication? Actually, there is a configuration class (called SecurityFilterChain) that is being invoked behind the scenes. It is configured with the following default implementation:
@Bean
public SecurityFilterChain filterChain(HttpSecurity http) throws Exception {
    http
        .authorizeHttpRequests(authorize -> authorize
            .anyRequest().authenticated()
        )
        .formLogin(withDefaults())
        .httpBasic(withDefaults());
    return http.build();
}
The default configuration (shown in the preceding example):
- Ensures that any request to our application requires the user to be authenticated
- Lets users authenticate with form based login
- Lets users authenticate with HTTP Basic authentication
Multiple HttpSecurity Instances
We can configure multiple HttpSecurity instances just as we can have multiple <http> blocks in XML. The key is to register multiple SecurityFilterChain@Beans. The following example has a different configuration for URLs that start with /api/.
@Configuration
@EnableWebSecurity
public class MultiHttpSecurityConfig {
    @Bean
    public UserDetailsService userDetailsService() throws Exception {
        // ensure the passwords are encoded properly
        UserBuilder users = User.withDefaultPasswordEncoder();
        InMemoryUserDetailsManager manager = new InMemoryUserDetailsManager();
        manager.createUser(users.username("user").password("password").roles("USER").build());
        manager.createUser(users.username("admin").password("password").roles("USER","ADMIN").build());
        return manager;
    }

    @Bean
    @Order(1)
    public SecurityFilterChain apiFilterChain(HttpSecurity http) throws Exception {
        http
            .securityMatcher("/api/**")
            .authorizeHttpRequests(authorize -> authorize
                .anyRequest().hasRole("ADMIN")
            )
            .httpBasic(withDefaults());
        return http.build();
    }

    @Bean
    public SecurityFilterChain formLoginFilterChain(HttpSecurity http) throws Exception {
        http
            .authorizeHttpRequests(authorize -> authorize
                .anyRequest().authenticated()
            )
            .formLogin(withDefaults());
        return http.build();
    }
}
| 1 | Configure Authentication as usual. |
|---|---|
| 2 | Create an instance of SecurityFilterChainthat contains @Orderto specify which SecurityFilterChainshould be considered first. |
| 3 | The http.securityMatcherstates that this HttpSecurityis applicable only to URLs that start with /api/. |
| 4 | Create another instance of SecurityFilterChain. If the URL does not start with /api/, this configuration is used. This configuration is considered after apiFilterChain, since it has an @Ordervalue after 1(no @Orderdefaults to last). |
文章作者:Administrator
文章链接:http://localhost:8090//archives/springsecurity6_3
版权声明:本博客所有文章除特别声明外,均采用CC BY-NC-SA 4.0 许可协议,转载请注明出处!
评论