SpringAI--Started
Reference
https://spring.io/projects/spring-ai
https://docs.spring.io/spring-ai/reference/
Concept
temperature & top_p
temperature
总所周知,在调用 LLM 的时候,如果想让模型的生成结果更加多样化,可以通过调高 top_p 或者 temperature 来实现,反之,如果调低这两个参数,则生成的结果会更加倾向同质化,总之,两种方式的应用场景不同。
首先,我们来看下temperature。
我们知道在物理世界中,温度越高的环境,熵越大,对应到概率世界中,熵越大,概率的不确定性越大,也就是概率分布越不集中,这就是第一种情况,
而当温度越低,熵越小,概率分布就越集中,这就是第二种情况。
因此,在LLM中,temperature的值在 0 and 2之间,默认值是1。
temperature的值越大,make the output more random;temperature的值越小,make the output more focused and deterministic.
使用场景:
高temperature适合诗歌生成、故事创作等需要多样性的场景;
低temperature适合事实性回答(如 QA 系统)、代码生成等需高准确性的任务
接下来,我们来看下temperature的值对场景影响的原理:
一只猫在 _ ,下一个token有以下几个,以及对应的概率:
玩 0.5
吃 0.3
跑 0.1
如果这时设置的temperature的值较大,比如2, 就会使用原始值,除以temperature,然后在得到的结果如下:
玩 0.25
吃 0.15
跑 0.05
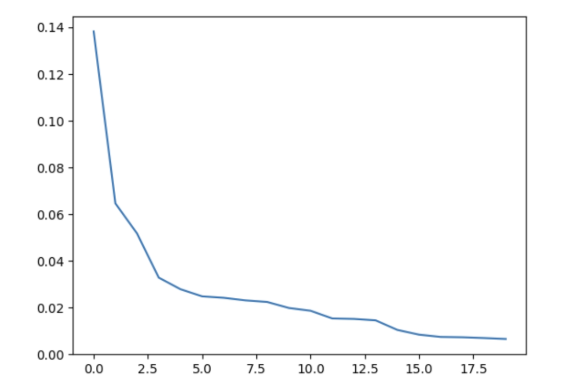
可以看到,3个选项之间,差距从原来的0.2,变成了现在的0.1,差距变小了。如果将他们的概率画成一条曲线,就会发现曲线平滑,即概率分布变得更为平滑,即原本评分很低的字与评分很高的字在计算得到的概率上变得相近,这样小概率的字被选中的机会就与其他字相当,从而使得输出结果更加多样化。
曲线如下:
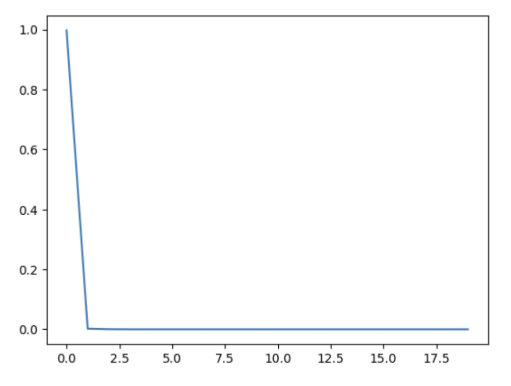
如果这时设置的temperature的值较大,比如0.5, 就会使用原始值,除以temperature,然后在得到的结果如下:
玩 1
吃 0.6
跑 0.2
可以看到,3个选项之间,差距从原来的0.2,变成了现在的0.4,差距变大了。如果将他们的概率画成一条曲线,就会发现概率分布会变得更加锐利,评分高的字的最终概率会更高,被选中的可能性也随之增加,导致输出结果更加一致。
曲线如下:
top_p
top_p 是大型语言模型 (LLM) 中用于控制文本生成多样性和质量的另一个重要参数,与 temperature 密切相关,但工作方式不同。它被称为“核心采样”(Nucleus Sampling)的阈值。
top_p的值,在0到1之间,默认值是1。
工作原理:
概率排序: 在生成每个词(token)时,LLM 会计算出词汇表中所有可能词的概率分布。top_p 不直接修改这些概率,而是影响 选择 哪些词。
累积概率: LLM 将所有可能的下一个词按照概率从高到低排序,然后 累加 这些概率。
阈值截断: 当累积概率达到或超过 top_p 设置的值时,停止累加。
候选词集合: 只有那些累积概率达到 top_p 阈值的词才会被保留作为候选词。
采样: LLM 从这个候选词集合中(根据它们的原始概率)进行采样,选择下一个词。
举例说明:
假设词汇表中有 10 个词,模型计算出每个词作为下一个词的概率如下:
词 | 概率 | 累积概率 (假设 top_p = 0.9) |
|---|---|---|
A | 0.3 | 0.3 |
B | 0.25 | 0.55 |
C | 0.2 | 0.75 |
D | 0.1 | 0.85 |
E | 0.06 | 0.91 |
F | 0.04 | 0.95 |
G | 0.02 | 0.97 |
H | 0.01 | 0.98 |
I | 0.01 | 0.99 |
J | 0.01 | 1.00 |
如果 top_p = 0.9:
累积概率在词 E 处超过了 0.9。
因此,只有 A、B、C、D 和 E 这五个词会被考虑作为下一个词的候选。
模型会根据这五个词的原始概率(0.3, 0.25, 0.2, 0.1, 0.06)进行加权随机选择。
如果 top_p = 0.5:
累积概率在词 B 处超过了 0.5。
只有 A 和 B 会被考虑。
作用和影响:
控制多样性: top_p 通过限制候选词的数量来控制生成文本的多样性。
top_p 值越小,候选词越少,生成的结果越确定、越集中于高概率词,多样性越低。
top_p 值越大,候选词越多,生成的结果越多样、越可能出现低概率但有趣的词,多样性越高。
避免低质量输出: 相比于只使用 temperature,top_p 通常能更好地避免生成无意义或重复的文本。因为它直接截断了低概率的尾部,防止模型选择那些概率极低的词。
与 top_p 和 temperature 经常一起使用。
temperature 影响 所有 词的概率分布(使分布更平坦或更尖锐)。
top_p 在 temperature 调整后的概率分布基础上,选择一个 子集 的词。
通常的做法是,先用 temperature 粗调多样性,再用 top_p 进行精细控制。
总结:
temperature,他影响了所有候选token的概率,也即影响了概率分布的形状(更平坦或者更锐利)
top_p,控制了子集的大小,是一个截断的过程。
Official Sample
https://github.com/danvega/awesome-spring-ai
https://docs.spring.io/spring-ai/docs/1.0.x/api/
构建start-demo
https://docs.spring.io/spring-ai/reference/api/chatclient.html
pom.xml中,增加以下内容:
 <properties>
        <java.version>17</java.version>
        <project.build.sourceEncoding>UTF-8</project.build.sourceEncoding>
        <project.reporting.outputEncoding>UTF-8</project.reporting.outputEncoding>
    </properties>


 <repositories>
        <repository>
            <id>spring-snapshots</id>
            <name>Spring Snapshots</name>
            <url>https://repo.spring.io/snapshot</url>
            <releases>
                <enabled>false</enabled>
            </releases>
        </repository>
        <repository>
            <name>Central Portal Snapshots</name>
            <id>central-portal-snapshots</id>
            <url>https://central.sonatype.com/repository/maven-snapshots/</url>
            <releases>
                <enabled>false</enabled>
            </releases>
            <snapshots>
                <enabled>true</enabled>
            </snapshots>
        </repository>
    </repositories>

    <dependencyManagement>
        <dependencies>
            <dependency>
                <groupId>org.springframework.ai</groupId>
                <artifactId>spring-ai-bom</artifactId>
                <version>1.0.0-SNAPSHOT</version>
                <type>pom</type>
                <scope>import</scope>
            </dependency>
        </dependencies>
    </dependencyManagement>
另外,增加以下依赖:
<dependencies>
        <dependency>
            <groupId>org.springframework.boot</groupId>
            <artifactId>spring-boot-starter-web</artifactId>
        </dependency>

        <dependency>
            <groupId>org.springframework.ai</groupId>
            <artifactId>spring-ai-starter-model-openai</artifactId>
        </dependency>

        <dependency>
            <groupId>org.springframework.boot</groupId>
            <artifactId>spring-boot-starter</artifactId>
        </dependency>

        <dependency>
            <groupId>org.springframework.boot</groupId>
            <artifactId>spring-boot-starter-test</artifactId>
            <scope>test</scope>
        </dependency>
    </dependencies>

    <build>
        <plugins>
            <plugin>
                <groupId>org.springframework.boot</groupId>
                <artifactId>spring-boot-maven-plugin</artifactId>
            </plugin>
        </plugins>
    </build>
接下来,在application.yaml中,增加以下配置:
spring:
  application:
    name: start-demo
  ai:
    openai:
      api-key: sk-bdd2ca4b70514c0aa4f4aceb6ecd3b77
      base-url: https://api.deepseek.com
      chat:
        options:
          model: deepseek-chat
      embedding:
        enabled: false
最后,创建一个controller:
package com.wp.startdemo.controller;

import org.springframework.ai.chat.client.ChatClient;
import org.springframework.web.bind.annotation.GetMapping;
import org.springframework.web.bind.annotation.RequestMapping;
import org.springframework.web.bind.annotation.RestController;

@RestController
@RequestMapping("/start-demo/my")
public class MyController {

    private final ChatClient chatClient;

    public MyController(ChatClient.Builder chatClientBuilder) {
        this.chatClient = chatClientBuilder.build();
    }

    @GetMapping("/ai")
    public String generation(String userInput) {
        return this.chatClient.prompt()
                .user(userInput)
                .call()
                .content();
    }
}
逻辑和概念梳理
ChatClient
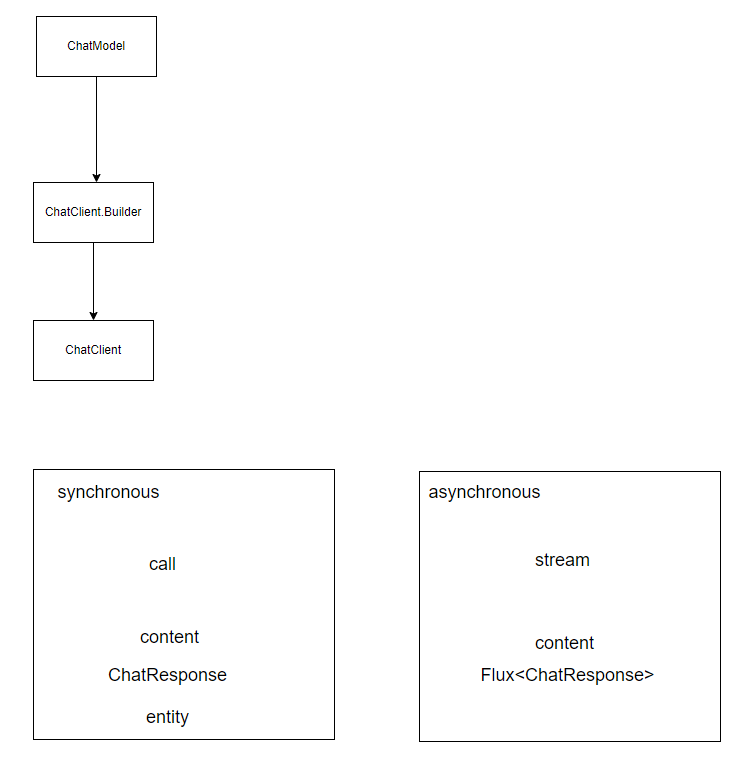
接下来,我们来看下ChatClient,关键的方法:prompt
 ChatClientRequestSpec prompt();

 ChatClientRequestSpec prompt(String content);

 ChatClientRequestSpec prompt(Prompt prompt);
这个prompt方法,返回ChatClientRequestSpec对象,这个ChatClientRequestSpec,常用的几个方法如下:
system
user
messages
options
call 、Stream
advisors
Advisors
The Advisors API provides a flexible and powerful way to intercept, modify, and enhance AI-driven interactions in your Spring applications.
A common pattern when calling an AI model with user text is to append or augment the prompt with contextual data.
This contextual data can be of different types. Common types include:
Your own data: This is data the AI model hasn’t been trained on. Even if the model has seen similar data, the appended contextual data takes precedence in generating the response.
Conversational history: The chat model’s API is stateless. If you tell the AI model your name, it won’t remember it in subsequent interactions. Conversational history must be sent with each request to ensure previous interactions are considered when generating a response.
Advisor Configuration in ChatClient
The ChatClient fluent API provides an AdvisorSpec interface for configuring advisors. This interface offers methods to add parameters, set multiple parameters at once, and add one or more advisors to the chain.
interface AdvisorSpec {
    AdvisorSpec param(String k, Object v);
    AdvisorSpec params(Map<String, Object> p);
    AdvisorSpec advisors(Advisor... advisors);
    AdvisorSpec advisors(List<Advisor> advisors);
}
ChatClient.builder(chatModel)
.build()
.prompt()
.advisors(
new MessageChatMemoryAdvisor(chatMemory), // CHAT MEMORY
new QuestionAnswerAdvisor(vectorStore) // RAG
)
.user(userText)
.call()
.content();In this configuration, the MessageChatMemoryAdvisor will be executed first, adding the conversation history to the prompt. Then, the QuestionAnswerAdvisor will perform its search based on the user’s question and the added conversation history, potentially providing more relevant results.
Chat Memory
The interface ChatMemory represents a storage for chat conversation history. It provides methods to add messages to a conversation, retrieve messages from a conversation, and clear the conversation history.
There are currently three implementations, InMemoryChatMemory, CassandraChatMemory and Neo4jChatMemory, that provide storage for chat conversation history, in-memory, persisted with time-to-live in Cassandra, and persisted without time-to-live in Neo4j correspondingly.
To create a CassandraChatMemory with time-to-live:
CassandraChatMemory.create(CassandraChatMemoryConfig.builder().withTimeToLive(Duration.ofDays(1)).build());The following advisor implementations use the ChatMemory interface to advice the prompt with conversation history which differ in the details of how the memory is added to the prompt
MessageChatMemoryAdvisor: Memory is retrieved and added as a collection of messages to the promptPromptChatMemoryAdvisor: Memory is retrieved and added into the prompt’s system text.VectorStoreChatMemoryAdvisor: The constructorVectorStoreChatMemoryAdvisor(VectorStore vectorStore, String defaultConversationId, int chatHistoryWindowSize, int order)This constructor allows you to:Specify the VectorStore instance used for managing and querying documents.
Set a default conversation ID to be used if none is provided in the context.
Define the window size for chat history retrieval in terms of token size.
Provide system text advice used for the chat advisor system.
Set the order of precedence for this advisor in the chain.
The VectorStoreChatMemoryAdvisor.builder() method lets you specify the default conversation ID, the chat history window size, and the order of the chat history to be retrieved.
A sample @Service implementation that uses several advisors is shown below.
import static org.springframework.ai.chat.client.advisor.AbstractChatMemoryAdvisor.CHAT_MEMORY_CONVERSATION_ID_KEY;
import static org.springframework.ai.chat.client.advisor.AbstractChatMemoryAdvisor.CHAT_MEMORY_RETRIEVE_SIZE_KEY;

@Service
public class CustomerSupportAssistant {    private final ChatClient chatClient;    public CustomerSupportAssistant(ChatClient.Builder builder, VectorStore vectorStore, ChatMemory chatMemory) {        this.chatClient = builder            .defaultSystem("""                    You are a customer chat support agent of an airline named "Funnair". Respond in a friendly,                    helpful, and joyful manner.                    Before providing information about a booking or cancelling a booking, you MUST always                    get the following information from the user: booking number, customer first name and last name.                    Before changing a booking you MUST ensure it is permitted by the terms.                    If there is a charge for the change, you MUST ask the user to consent before proceeding.                    """)            .defaultAdvisors(                    new MessageChatMemoryAdvisor(chatMemory), // CHAT MEMORY
                    new QuestionAnswerAdvisor(vectorStore), // RAG
                    new SimpleLoggerAdvisor())            .defaultFunctions("getBookingDetails", "changeBooking", "cancelBooking") // FUNCTION CALLING
            .build();    }    public Flux<String> chat(String chatId, String userMessageContent) {        return this.chatClient.prompt()                .user(userMessageContent)                .advisors(a -> a                        .param(CHAT_MEMORY_CONVERSATION_ID_KEY, chatId)                        .param(CHAT_MEMORY_RETRIEVE_SIZE_KEY, 100))                .stream().content();    }}
Logging
The SimpleLoggerAdvisor is an advisor that logs the request and response data of the ChatClient. This can be useful for debugging and monitoring your AI interactions.
To enable logging, add the SimpleLoggerAdvisor to the advisor chain when creating your ChatClient. It’s recommended to add it toward the end of the chain:
ChatResponse response = ChatClient.create(chatModel).prompt()
        .advisors(new SimpleLoggerAdvisor())
        .user("Tell me a joke?")
        .call()
        .chatResponse();
To see the logs, set the logging level for the advisor package to DEBUG:
logging.level.org.springframework.ai.chat.client.advisor=DEBUG
Add this to your application.properties or application.yaml file.
You can customize what data from AdvisedRequest and ChatResponse is logged by using the following constructor:
SimpleLoggerAdvisor(
    Function<AdvisedRequest, String> requestToString,
    Function<ChatResponse, String> responseToString
)
Example usage:
SimpleLoggerAdvisor customLogger = new SimpleLoggerAdvisor(
    request -> "Custom request: " + request.userText,
    response -> "Custom response: " + response.getResult()
);
This allows you to tailor the logged information to your specific needs.
Structured Output Converter
https://docs.spring.io/spring-ai/reference/api/structured-output-converter.html
StructuredOutputConverter
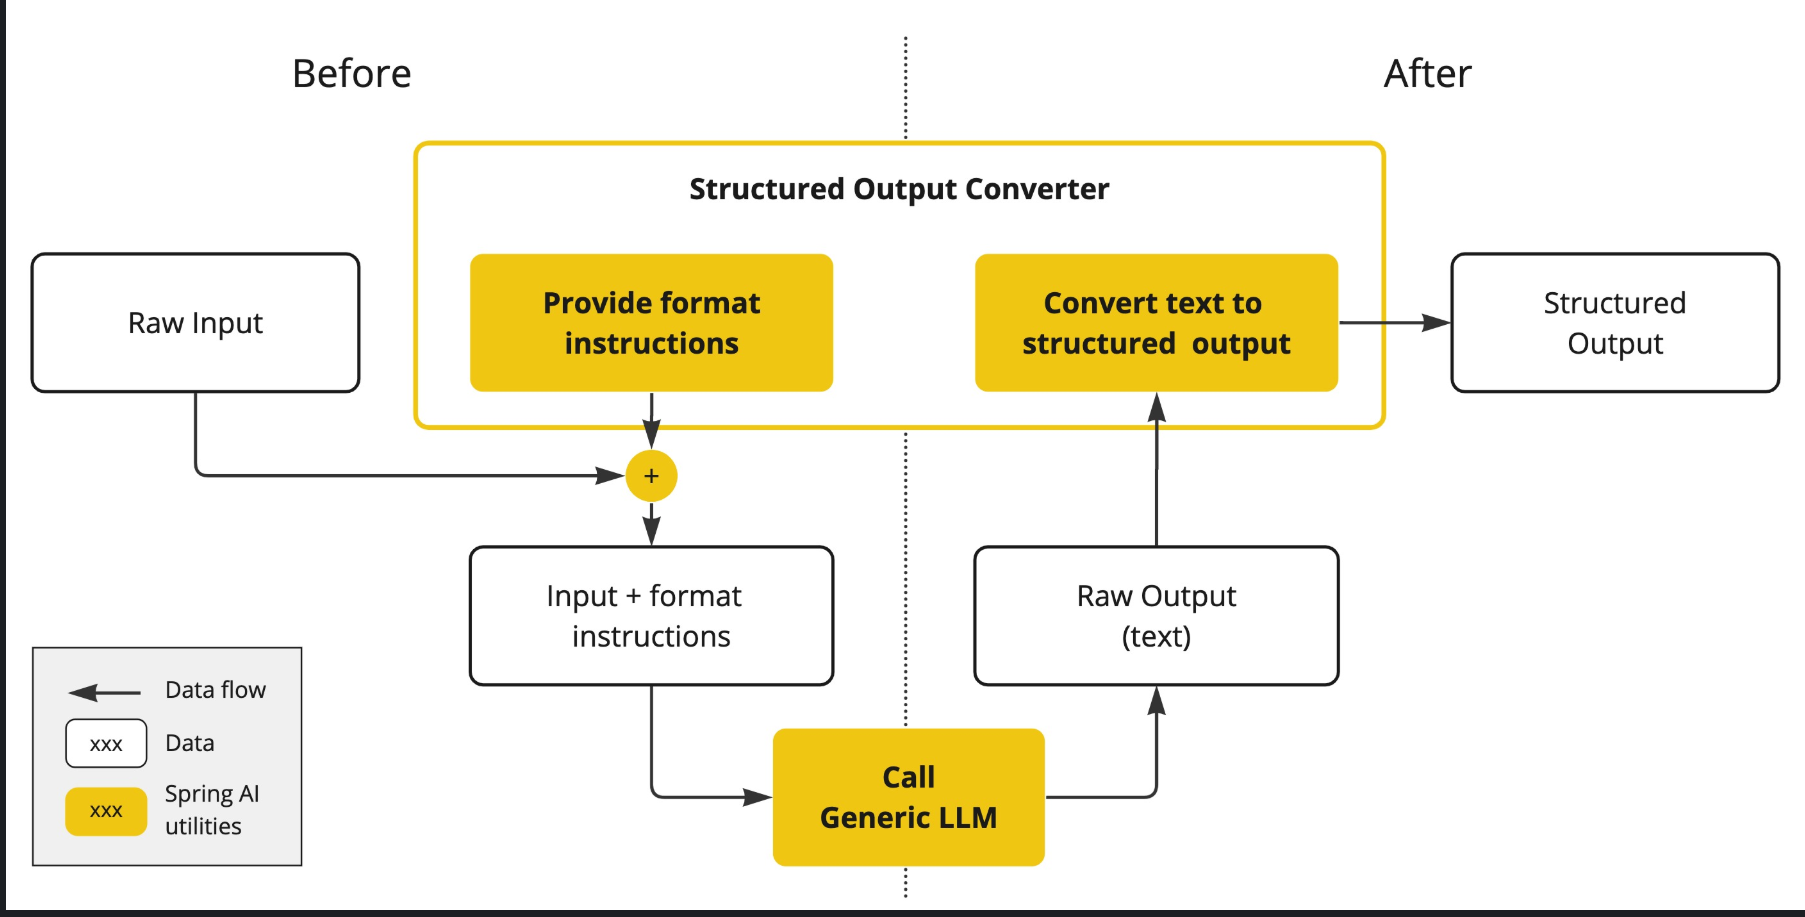
Generating structured outputs from Large Language Models (LLMs) using generic completion APIs requires careful handling of inputs and outputs. The structured output converter plays a crucial role before and after the LLM call, ensuring the desired output structure is achieved.
Before the LLM call, the converter appends format instructions to the prompt, providing explicit guidance to the models on generating the desired output structure. These instructions act as a blueprint, shaping the model’s response to conform to the specified format.
After the LLM call, the converter takes the model’s output text and transforms it into instances of the structured type. This conversion process involves parsing the raw text output and mapping it to the corresponding structured data representation, such as JSON, XML, or domain-specific data structures.
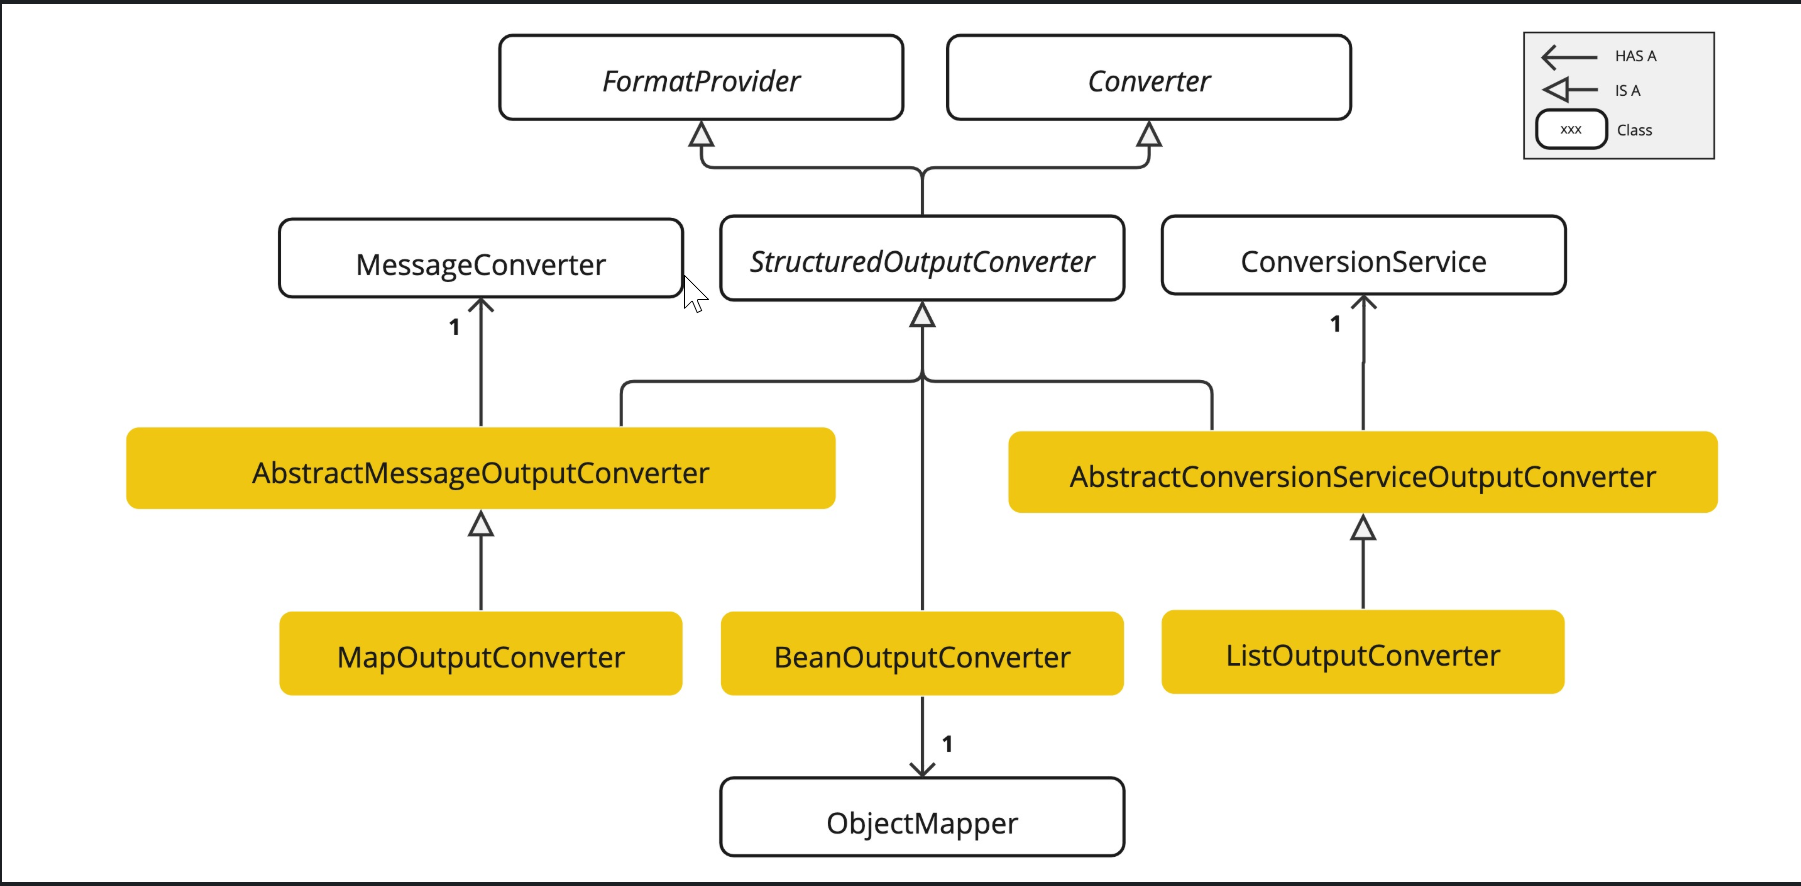
public interface StructuredOutputConverter<T> extends Converter<String, T>, FormatProvider {


}

// It combines the Spring Converter<String, T> interface and the FormatProvider interface
public interface FormatProvider {
    String getFormat();
}
The following diagram shows the data flow when using the structured output API.
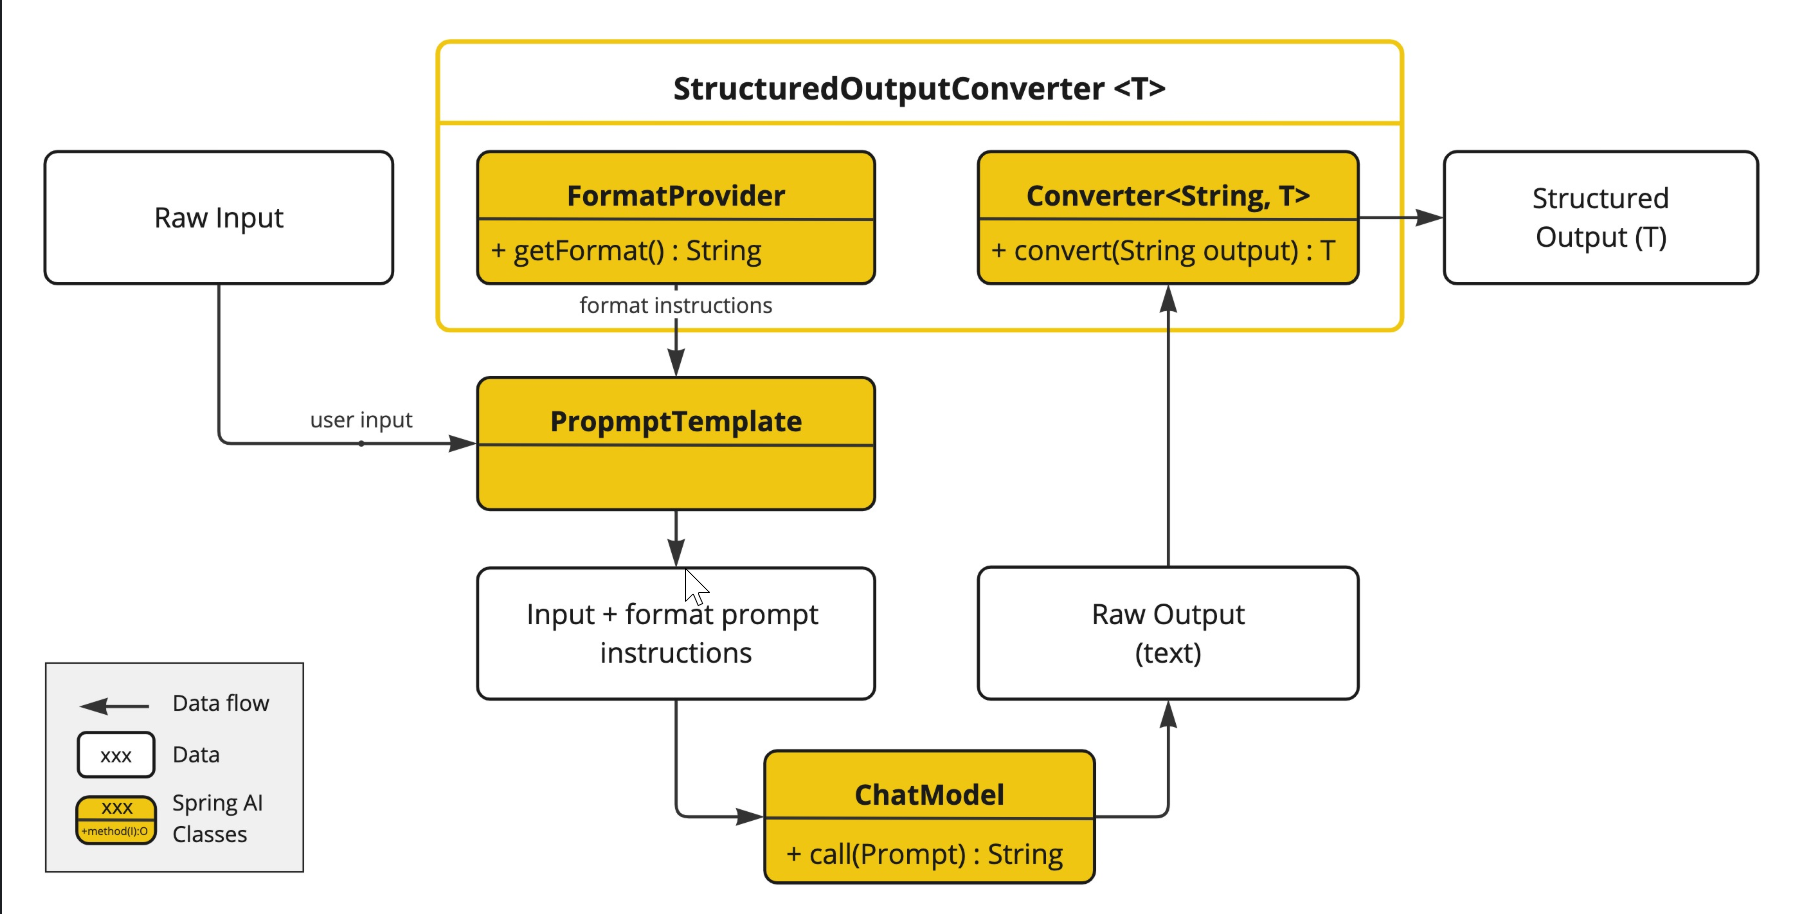
The FormatProvider supplies specific formatting guidelines to the AI Model, enabling it to produce text outputs that can be converted into the designated target type T using the Converter. Here is an example of such formatting instructions:
Your response should be in JSON format. The data structure for the JSON should match this Java class: java.util.HashMap Do not include any explanations, only provide a RFC8259 compliant JSON response following this format without deviation.
The format instructions are most often appended to the end of the user input using the PromptTemplate like this:
  StructuredOutputConverter outputConverter = ...
    String userInputTemplate = """
        ... user text input ....
        {format}
        """; // user input with a "format" placeholder.
    Prompt prompt = new Prompt(
       new PromptTemplate(
               this.userInputTemplate,
          Map.of(..., "format", outputConverter.getFormat()) // replace the "format" placeholder with the converter's format.
       ).createMessage());
The Converter<String, T> is responsible to transform output text from the model into instances of the specified type T.
Available Converters
Currently, Spring AI provides AbstractConversionServiceOutputConverter, AbstractMessageOutputConverter, BeanOutputConverter, MapOutputConverter and ListOutputConverter implementations:
Using Converters
Bean Output Converter
Java class Bean
The target record representing actor’s filmography:
record ActorsFilms(String actor, List<String> movies) {
}
Here is how to apply the BeanOutputConverter using the high-level, fluent ChatClient API:
ActorsFilms actorsFilms = ChatClient.create(chatModel).prompt()
        .user(u -> u.text("Generate the filmography of 5 movies for {actor}.")
                    .param("actor", "Tom Hanks"))
        .call()
        .entity(ActorsFilms.class);
or using the low-level ChatModel API directly:
BeanOutputConverter<ActorsFilms> beanOutputConverter =
    new BeanOutputConverter<>(ActorsFilms.class);

String format = this.beanOutputConverter.getFormat();

String actor = "Tom Hanks";

String template = """
        Generate the filmography of 5 movies for {actor}.
        {format}
        """;

Generation generation = chatModel.call(
    new PromptTemplate(this.template, Map.of("actor", this.actor, "format", this.format)).create()).getResult();

ActorsFilms actorsFilms = this.beanOutputConverter.convert(this.generation.getOutput().getText());
Generic Bean Types
Use the ParameterizedTypeReference constructor to specify a more complex target class structure. For example, to represent a list of actors and their filmographies:
List<ActorsFilms> actorsFilms = ChatClient.create(chatModel).prompt()
        .user("Generate the filmography of 5 movies for Tom Hanks and Bill Murray.")
        .call()
        .entity(new ParameterizedTypeReference<List<ActorsFilms>>() {});
or using the low-level ChatModel API directly:
BeanOutputConverter<List<ActorsFilms>> outputConverter = new BeanOutputConverter<>(
        new ParameterizedTypeReference<List<ActorsFilms>>() { });

String format = this.outputConverter.getFormat();
String template = """
        Generate the filmography of 5 movies for Tom Hanks and Bill Murray.
        {format}
        """;

Prompt prompt = new PromptTemplate(this.template, Map.of("format", this.format)).create();

Generation generation = chatModel.call(this.prompt).getResult();

List<ActorsFilms> actorsFilms = this.outputConverter.convert(this.generation.getOutput().getText());
Map Output Converter
The following snippet shows how to use MapOutputConverter to convert the model output to a list of numbers in a map.
Map<String, Object> result = ChatClient.create(chatModel).prompt()
        .user(u -> u.text("Provide me a List of {subject}")
                    .param("subject", "an array of numbers from 1 to 9 under they key name 'numbers'"))
        .call()
        .entity(new ParameterizedTypeReference<Map<String, Object>>() {});
or using the low-level ChatModel API directly:
MapOutputConverter mapOutputConverter = new MapOutputConverter();

String format = this.mapOutputConverter.getFormat();
String template = """
        Provide me a List of {subject}
        {format}
        """;

Prompt prompt = new PromptTemplate(this.template,
        Map.of("subject", "an array of numbers from 1 to 9 under they key name 'numbers'", "format", this.format)).create();

Generation generation = chatModel.call(this.prompt).getResult();

Map<String, Object> result = this.mapOutputConverter.convert(this.generation.getOutput().getText());
List Output Converter
The following snippet shows how to use ListOutputConverter to convert the model output into a list of ice cream flavors.
List<String> flavors = ChatClient.create(chatModel).prompt()
                .user(u -> u.text("List five {subject}")
                            .param("subject", "ice cream flavors"))
                .call()
                .entity(new ListOutputConverter(new DefaultConversionService()));
or using the low-level ChatModel API directly:
ListOutputConverter listOutputConverter = new ListOutputConverter(new DefaultConversionService());

String format = this.listOutputConverter.getFormat();
String template = """
        List five {subject}
        {format}
        """;

Prompt prompt = new PromptTemplate(this.template,
        Map.of("subject", "ice cream flavors", "format", this.format)).create();

Generation generation = this.chatModel.call(this.prompt).getResult();

List<String> list = this.listOutputConverter.convert(this.generation.getOutput().getText());
DeepSeek原生接口

响应的格式如下:
{
    "id": "5cb562b6-6e39-42c2-a1e4-891dd4bc1874",
    "object": "chat.completion.chunk",
    "created": 1744602819,
    "model": "deepseek-chat",
    "system_fingerprint": "fp_3d5141a69a_prod0225",
    "choices": [
        {
            "index": 0,
            "delta": {
                "content": "Hello"
            },
            "logprobs": null,
            "finish_reason": null
        }
    ]
}
DeepSeek API的返回结果包含多个核心字段,其含义解析如下:
一、主要响应字段
choices
核心字段,包含模型生成的结果数组。每个元素包含:
message.content:模型生成的主要文本内容(如回答或代码)message.role:角色标识(如"assistant")finish_reason:生成终止原因(如"stop"表示正常结束)推理模型特有字段(如DeepSeek-R1):
model_extra['reasoning_content']:展示模型的思维链推理过程
id
本次API调用的唯一标识符,用于日志追踪。
model
实际调用的模型名称(如
deepseek-chat或deepseek-reasoner)。
usage
资源消耗统计:
total_tokens:本次请求总Token数(输入+输出)prompt_tokens:输入内容占用的Token数completion_tokens:生成内容占用的Token数。
二、特殊场景字段
logprobs(需请求时开启)
每个生成Token的概率分布,用于调试生成质量。
error(错误响应)
包含错误码和描述(如401表示API Key无效,429表示请求频率超限)。
三、参数关联字段
部分字段与请求参数直接关联:
temperature/top_p:影响
choices内容的随机性(值越高,结果越发散)max_tokens:限制
choices[0].message.content的文本长度
示例解析
以DeepSeek-R1模型调用为例:
{
  "id": "chatcmpl-xxx",
  "model": "deepseek-reasoner",
  "choices": [{
    "message": {
      "content": "9.11更大",
      "role": "assistant",
      "model_extra": {"reasoning_content": "比较整数部分:9=9,小数部分0.11>0.08..."}
    },
    "finish_reason": "stop"
  }],
  "usage": {"total_tokens": 150, "prompt_tokens": 50, "completion_tokens": 100}
}此结果中,content为最终答案,reasoning_content展示推理逻辑,usage反映资源消耗。
如需更详细的错误码说明或参数优化建议,可参考官方文档。
流式输出
SSE Protocol
https://developer.mozilla.org/en-US/docs/Web/API/Server-sent_events/Using_server-sent_events
Event stream format
The event stream is a simple stream of text data which must be encoded using UTF-8. Messages in the event stream are separated by a pair of newline characters. A colon as the first character of a line is in essence a comment, and is ignored.
Fields
Each message received has some combination of the following fields, one per line:
event
A string identifying the type of event described. If this is specified, an event will be dispatched on the browser to the listener for the specified event name; the website source code should use addEventListener() to listen for named events. The onmessage handler is called if no event name is specified for a message.
data
The data field for the message. When the EventSource receives multiple consecutive lines that begin with data:, it concatenates them, inserting a newline character between each one. Trailing newlines are removed.
id
The event ID to set the EventSource object's last event ID value.
浏览器用lastEventId属性读取这个值。一旦连接断线,浏览器会发送一个 HTTP 头,里面包含一个特殊的Last-Event-ID头信息,将这个值发送回来,用来帮助服务器端重建连接。因此,这个头信息可以被视为一种同步机制。
retry
The reconnection time. If the connection to the server is lost, the browser will wait for the specified time before attempting to reconnect. This must be an integer, specifying the reconnection time in milliseconds. If a non-integer value is specified, the field is ignored.
All other field names are ignored.
Examples
Data-only messages
In the following example, there are three messages sent. The first is just a comment, since it starts with a colon character. As mentioned previously, this can be useful as a keep-alive mechanism if messages might not be sent regularly.
The second message contains a data field with the value "some text". The third message contains a data field with the value "another message\nwith two lines". Note the newline special character in the value.
bashCopy to Clipboard
: this is a test stream

data: some text

data: another message
data: with two lines
Named events
This example sends named events. Each has an event name specified by the event field, and a data field whose value is an appropriate JSON string with the data needed for the client to act on the event. The data field could, of course, have any string data; it doesn't have to be JSON.
bashCopy to Clipboard
event: userconnect
data: {"username": "bobby", "time": "02:33:48"}

event: usermessage
data: {"username": "bobby", "time": "02:34:11", "text": "Hi everyone."}

event: userdisconnect
data: {"username": "bobby", "time": "02:34:23"}

event: usermessage
data: {"username": "sean", "time": "02:34:36", "text": "Bye, bobby."}
Mixing and matching
You don't have to use just unnamed messages or typed events; you can mix them together in a single event stream.
bashCopy to Clipboard
event: userconnect
data: {"username": "bobby", "time": "02:33:48"}

data: Here's a system message of some kind that will get used
data: to accomplish some task.

event: usermessage
data: {"username": "bobby", "time": "02:34:11", "text": "Hi everyone."}
Spring WebFlux 与 SseEmitter
https://blog.csdn.net/mst_sun/article/details/136484357
Spring WebFlux 与 SseEmitter 是两种处理服务器推送事件(SSE)的技术方案,分别基于响应式编程模型和传统同步模型。
以下是两者的核心对比及协作关系:
一、技术定位与实现机制
SseEmitter(基于 Spring MVC)
同步阻塞模型:依赖 Servlet 容器,每个 SSE 连接占用一个线程,需开发者手动管理连接池(如维护
ConcurrentHashMap存储SseEmitter对象)。手动协议处理:需显式调用
send()、complete()等方法推送事件,并通过线程池实现异步推送。适用场景:轻量级实时推送(如聊天消息、监控数据),适合中小并发场景。
Flux(响应式模型)
异步非阻塞:基于 Reactor 库,通过
Flux流处理数据,单线程可管理数千连接,天然支持高并发。自动协议转换:控制器直接返回
Flux<ServerSentEvent>,设置produces = TEXT_EVENT_STREAM_VALUE即可自动生成 SSE 格式流,无需手动处理协议细节。适用场景:高吞吐量实时数据流(如日志推送、AI 对话),适合云原生和微服务架构。
二、核心差异对比
维度 | SseEmitter | Spring WebFlux |
|---|---|---|
编程模型 | 同步阻塞(Servlet) | 异步非阻塞(Reactor) |
连接管理 | 手动维护连接池,需处理超时、异常 | 自动管理连接,内置背压控制 |
协议处理 | 需手动拼接事件字段(如 | 自动转换 |
性能 | 线程数限制,适合低并发 | 高吞吐量,适合万级并发连接 |
代码复杂度 | 高(需异步线程、连接池) | 低(声明式 API,代码简洁) |
三、协作场景与最佳实践
混合架构中的分工
WebFlux 主导推送:在需要处理大规模流式数据(如实时日志、IoT 传感器数据)时,优先使用 WebFlux 的
Flux简化开发。SseEmitter 补充控制:若需精细控制单个连接(如按用户 ID 定向推送),可结合
SseEmitter实现连接与业务逻辑的绑定。
集群环境下的扩展
SseEmitter 集群方案:需借助 Redis 缓存连接信息,并通过 HTTP 转发请求到对应服务节点。
WebFlux 原生扩展:依托响应式背压和非阻塞 I/O,天然适合分布式环境,减少中间件依赖。
典型代码示例
SseEmitter(Spring MVC)
java
复制
@GetMapping("/sse") public SseEmitter streamData() { SseEmitter emitter = new SseEmitter(); executorService.execute(() -> { for (int i = 0; i < 10; i++) { emitter.send("Event " + i); sleep(1); } emitter.complete(); }); return emitter; }WebFlux(响应式 SSE)
java
复制
@GetMapping(value = "/stream", produces = TEXT_EVENT_STREAM_VALUE)
public Flux<ServerSentEvent<String>> stream() {
  return Flux.interval(Duration.ofSeconds(1))
             .map(seq -> ServerSentEvent.builder("Event " + seq).build());
}
四、选型建议
选择 SseEmitter 的情况:
项目基于 Spring MVC,且无需高并发(如内部管理系统)。
需精确控制连接生命周期(如动态关闭指定用户的推送)。
选择 WebFlux 的情况:
高并发、低延迟场景(如金融行情、万人聊天室)。
已采用响应式生态(如 Spring Data Reactive、R2DBC)。
五、总结
SseEmitter 和 Spring WebFlux 分别代表了 SSE 实现的两种范式:同步控制与响应式自动化。在微服务架构中,可结合两者优势——WebFlux 处理主流数据流,SseEmitter 补充定向推送需求。对于新项目,优先采用 WebFlux 以拥抱响应式编程的高效与简洁。
Web & Webflux
传统的spring-boot-starter-web,它的架构组合【spring-webmvc + Servlet + Tomcat】命令式的、同步阻塞的 响应式spring-boot-starter-webflux框架,它的架构组合【spring-webflux + Reactor + Netty】响应式的、异步非阻塞的
在配置文件(如application.properties或application.yml)中,添加以下属性:
spring.main.web-application-type = reactive
它有两个可选值:
SERVLET:表示将应用程序配置为使用传统的Servlet API和阻塞I/O操作的Web堆栈。这是默认值,适用于大多数传统的Spring MVC应用程序。
REACTIVE:表示将应用程序配置为使用Reactive编程模型和非阻塞I/O操作的Web堆栈。这适用于使用Spring WebFlux构建的响应式应用程序。
APIFox与SSE
https://docs.apifox.com/5219195m0
https://developer.mozilla.org/zh-CN/docs/Web/API/Server-sent_events/Using_server-sent_events
同时使用MVC 和 Reactor
pom.xml中依赖如下:
 <dependencies>
        <dependency>
            <groupId>org.springframework.boot</groupId>
            <artifactId>spring-boot-starter-webflux</artifactId>
            <exclusions>
                <!-- 排除默认的 Netty 服务器 -->
                <exclusion>
                    <groupId>org.springframework.boot</groupId>
                    <artifactId>spring-boot-starter-reactor-netty</artifactId>
                </exclusion>
            </exclusions>
        </dependency>

        <dependency>
            <groupId>org.springframework.boot</groupId>
            <artifactId>spring-boot-starter-test</artifactId>
            <scope>test</scope>
        </dependency>
        <dependency>
            <groupId>io.projectreactor</groupId>
            <artifactId>reactor-test</artifactId>
            <scope>test</scope>
        </dependency>

        <!-- 添加 Tomcat 服务器(支持响应式) -->
<!--        <dependency>-->
<!--            <groupId>org.springframework.boot</groupId>-->
<!--            <artifactId>spring-boot-starter-tomcat</artifactId>-->
<!--        </dependency>-->

        <dependency>
            <groupId>org.springframework.boot</groupId>
            <artifactId>spring-boot-starter-web</artifactId>
        </dependency>
    </dependencies>
可以看到,同时引入了webflux 和 webmvc的依赖。
他们分别对应以下的自动配置类:
*
WebMvcAutoConfiguration*:当检测到 Servlet API 时激活*
WebFluxAutoConfiguration*:当检测到 Reactor 依赖时激活
当同时存在webflux 和 webmvc的依赖,默认是启用webmvc,禁用webflux。
但是,虽然禁用了webflux,当时sse,还是可以正常使用的。controller中写法如下:
package com.wp.webfluxdemo.controller;

import com.wp.webfluxdemo.entity.CountryCity;
import com.wp.webfluxdemo.entity.CountryCityBuilder;
import org.springframework.http.MediaType;
import org.springframework.http.codec.ServerSentEvent;
import org.springframework.web.bind.annotation.*;
import reactor.core.publisher.Flux;

import java.time.Duration;
import java.time.LocalTime;
import java.util.List;
import java.util.concurrent.atomic.AtomicInteger;

@RequestMapping("/flux/first")
@RestController
public class FirstController {

    @RequestMapping(value = "/getJson", method = RequestMethod.GET)
    @ResponseBody
    public List<CountryCity> getJson() {
        CountryCity chinaCity = CountryCityBuilder.create().withCountry("china")
                .withCities(List.of("Beijing", "Shanghai", "ShenZhen", "Guangdong","Nanjing")).build();
        CountryCity americanCity = CountryCityBuilder.create().withCountry("american")
                .withCities(List.of("newyork", "Los Angeles", "Chicago")).build();
        return List.of(chinaCity,americanCity);
    }

    @RequestMapping(value = "/getCityByCountry/{country}", method = RequestMethod.GET)
    public Flux<String> getAlphaLevelCitys(@PathVariable("country") String country) {
        System.out.println("input param:"+country);
        Flux<String> flux = Flux.just("Beijing", "Shanghai", "ShenZhen", "Guangdong");
        return flux;
    }

    @GetMapping(value = "/getCountryCitys")
    public Flux<CountryCity> getCountryCitys() {
        CountryCity chinaCity = CountryCityBuilder.create().withCountry("china")
                .withCities(List.of("Beijing", "Shanghai", "ShenZhen", "Guangdong")).build();
        CountryCity americanCity = CountryCityBuilder.create().withCountry("american")
                .withCities(List.of("newyork", "Los Angeles", "Chicago")).build();
        Flux<CountryCity> flux = Flux.just(chinaCity, americanCity);
        return flux;
    }

    @GetMapping(value = "/sse",produces = MediaType.TEXT_EVENT_STREAM_VALUE)
    public Flux<ServerSentEvent<String>> sse() {
        return Flux.interval(Duration.ofSeconds(1))
                .map(sequence -> ServerSentEvent.<String>builder()
                        .id(String.valueOf(sequence))
                        .event("periodic-event")
                        .data("Current time: " + LocalTime.now())
                        .build()).take(5);
    }
}
可以看到,原来的mvc json,添加了一个@ResponseBody注解,就可以正常使用了。
而对于SSE,只需要指定produces = MediaType.TEXT_EVENT_STREAM_VALUE,就可以正常使用了。
原理如下:
当添加了@ResponseBody注解后,对于返回值,采用的是RequestResponseBodyMethodProcessor;
当指定produces = MediaType.TEXT_EVENT_STREAM_VALUE,采用的是ResponseBodyEmitterReturnValueHandler。
调用栈如下:
org.springframework.web.servlet.mvc.method.annotation.RequestMappingHandlerAdapter#invokeHandlerMethod
--->
org.springframework.web.servlet.mvc.method.annotation.ServletInvocableHandlerMethod#invokeAndHandle
--->
org.springframework.web.method.support.HandlerMethodReturnValueHandlerComposite#handleReturnValue
--->
org.springframework.web.method.support.HandlerMethodReturnValueHandlerComposite#selectHandler文章作者:Administrator
文章链接:http://localhost:8090//archives/springai--started
版权声明:本博客所有文章除特别声明外,均采用CC BY-NC-SA 4.0 许可协议,转载请注明出处!
评论